
dPhish Final Phase CTF Writeup
A practical walkthrough of dPhish Final Phase CTF, tracing a phishing campaign from a compromised internal mailbox through attacker infrastructure, malicious PowerShell attachment analysis, and the final flag.

Introduction
dPhish Final Phase was an email investigation CTF focused on a realistic phishing incident. The story starts with one compromised internal account, then expands into attacker infrastructure, malicious attachments, detection logic, response actions, and finally a flag hidden inside an email body.
I used two main places during the investigation:
dctf.dphish.live/challengesfor the questionsctf.dphish.live/admin-panel/discover/overviewfor the investigation platform
My main approach was simple: start from the suspicious sender, pivot through the evidence that the platform already gives us, and avoid guessing whenever a graph node, raw email field, rule, or response view can confirm the answer.
1. Compromised Account
Q1 - The compromised account
One internal account sent password-reset / IT emails to a large number of employees.
In the Graph View, find the Person node with an unusually high number of outgoing "Sent" edges.

Submit the full email address of that account.
I started from Graph View because the question is about relationships, not just a single email. If one mailbox is sending a lot of similar password reset messages, the graph should show a clear fan-out pattern from that account or from its related email nodes.
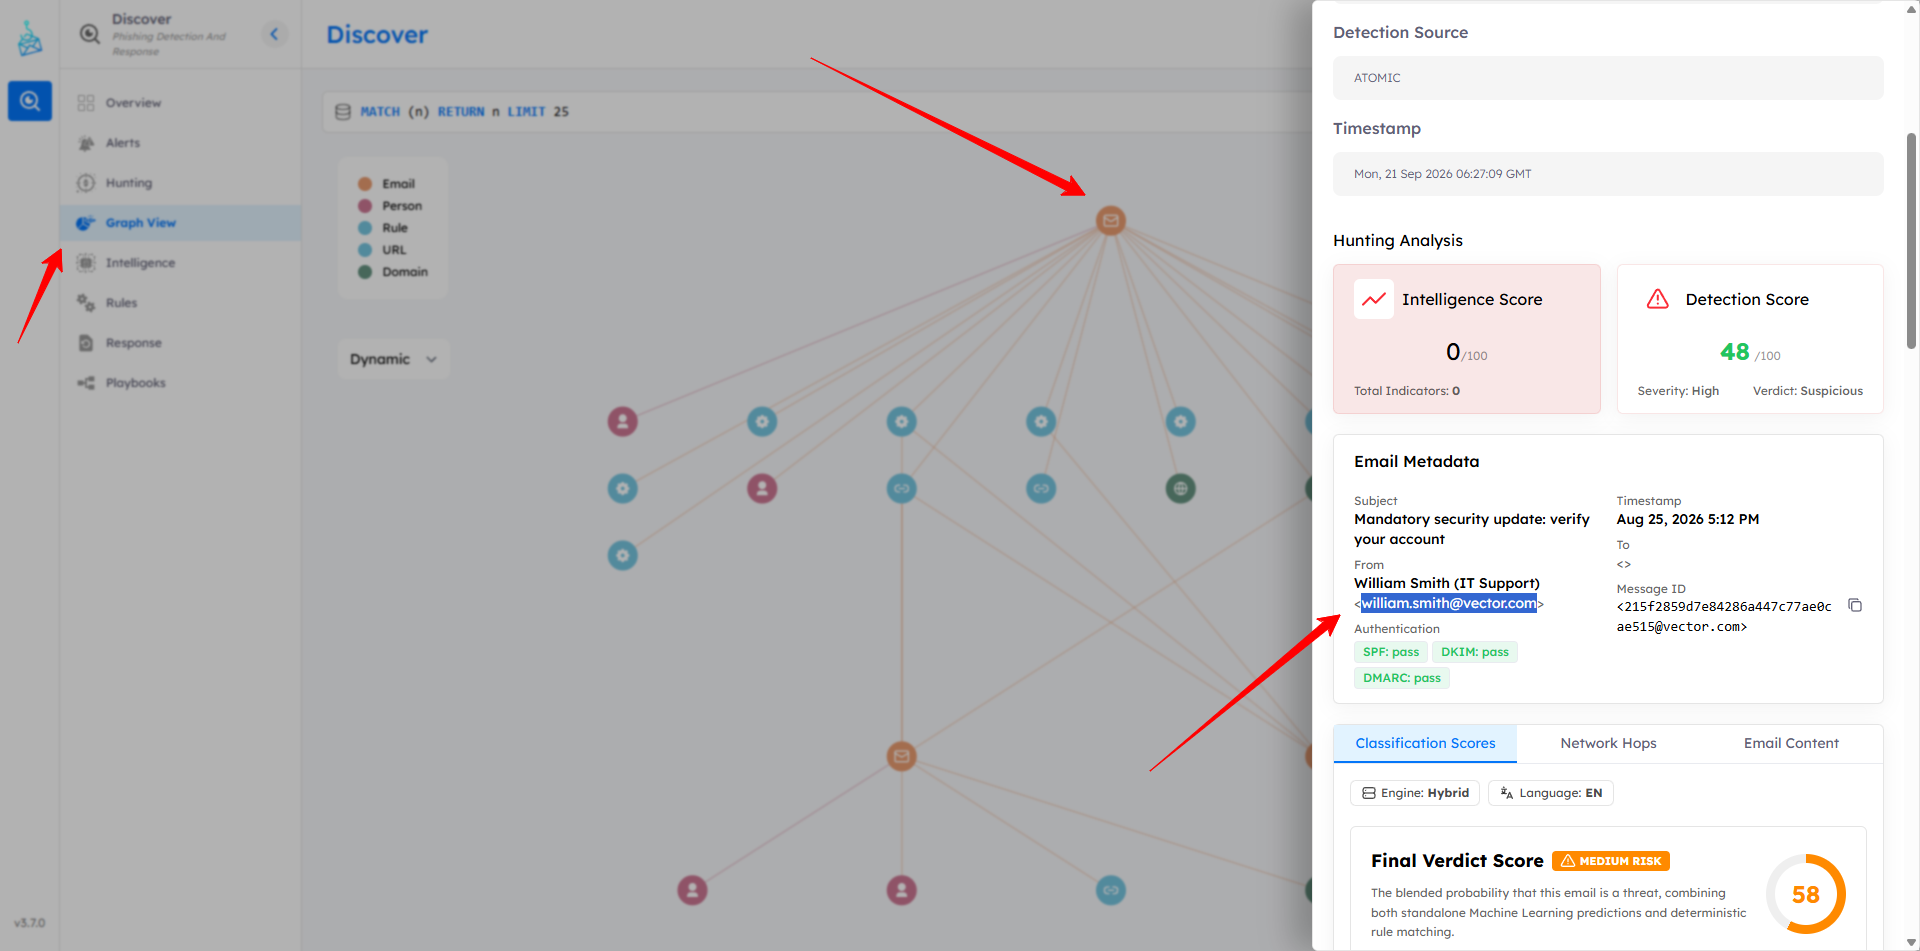
Opening the related email metadata showed that the suspicious sender was william.smith@vector.com. The number of outgoing sent relationships made it stand out as the compromised mailbox.
Answer: william.smith@vector.com
Q2 - Display name
Open any of the malicious emails from that account.
What display name does it use in the "From" field?
After identifying the account, the next step was to open one of the malicious emails from that sender and inspect the normal email metadata. The display name is usually shown beside the sender email address in the From field.
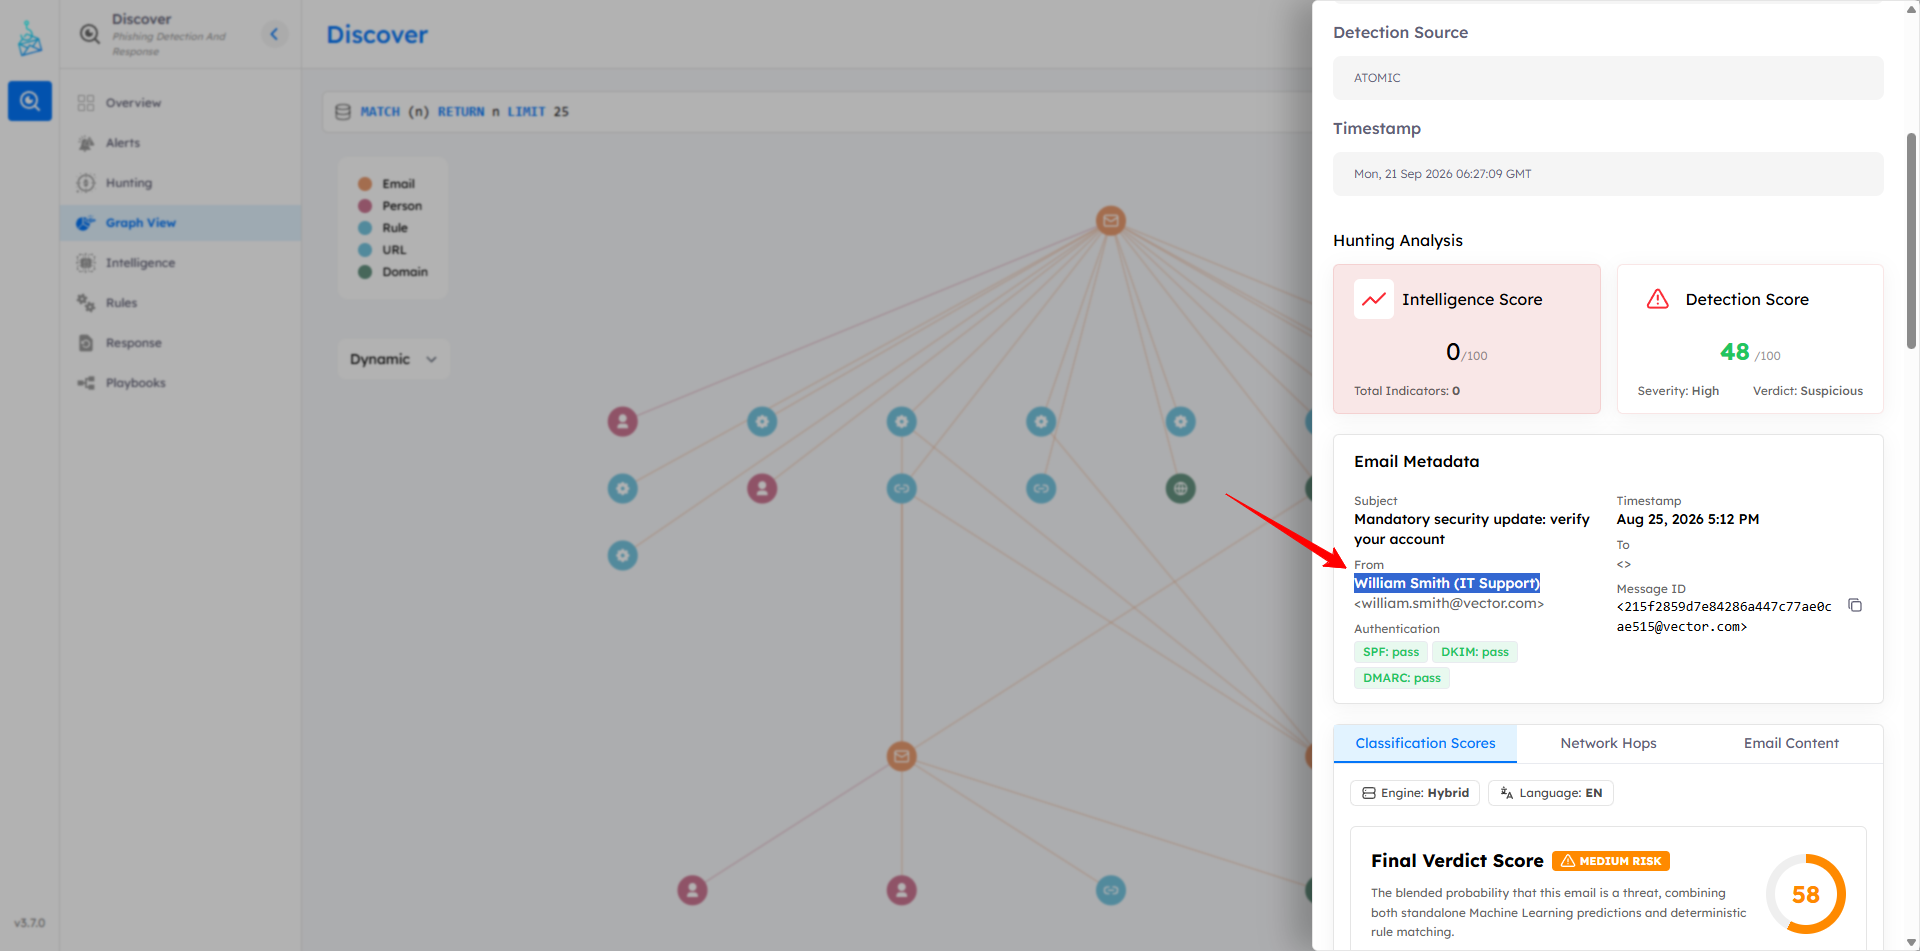
The From field showed William Smith (IT Support) <william.smith@vector.com>, which fits the phishing theme because the attacker wanted the message to look like an internal IT support notification.
Answer: William Smith (IT Support)
Q3 - Email authentication
Check the Authentication-Results header of the lure emails.
Did they PASS or FAIL SPF/DKIM/DMARC?

This is the key insight: the mailbox is a real, compromised account,
so authentication passes.
This was an important clue. If the attacker only spoofed the sender, SPF, DKIM, or DMARC would often fail. But because the attacker used a real compromised internal mailbox, the authentication checks passed.
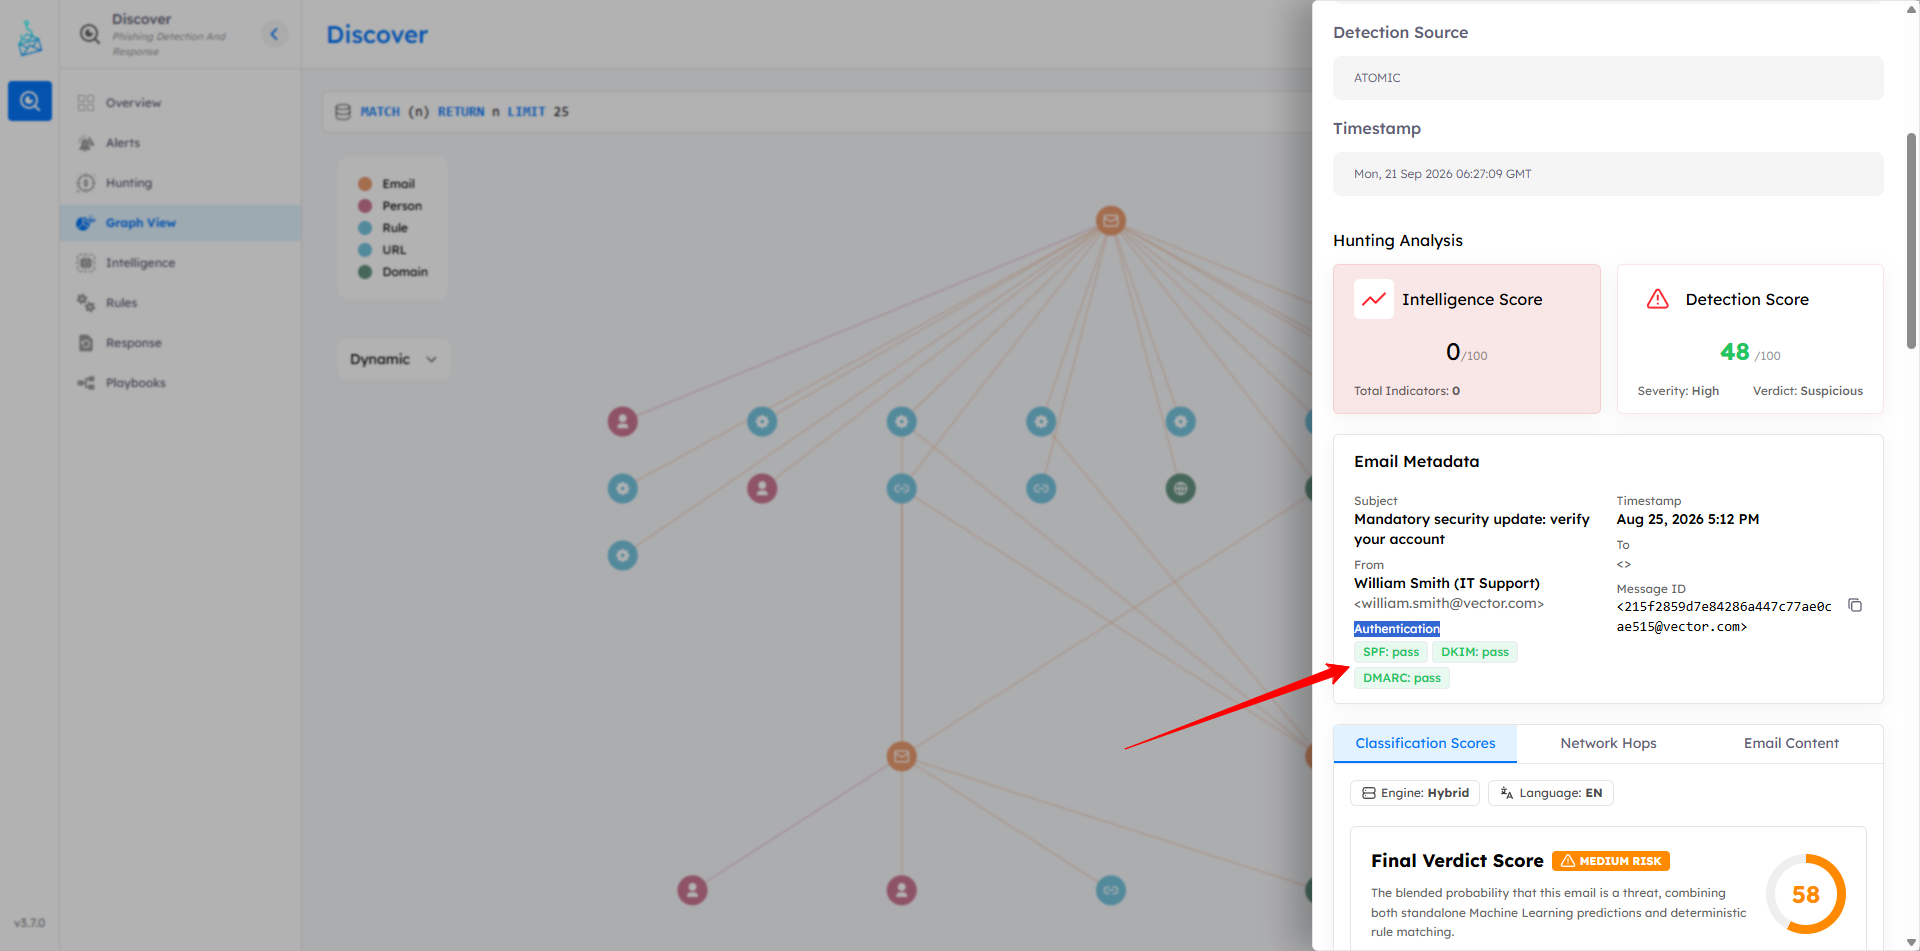
The metadata showed SPF: pass, DKIM: pass, and DMARC: pass.
Answer: PASS
2. Origin and Timeline
Q4 - First email time
Find the earliest phishing email sent by this account.
Based on its created_at timestamp, when was it sent?

Answer format: Day, DD Mon YYYY HH:MM:SS
Once the sender was known, I moved to Hunting and filtered on from:"william.smith@vector.com". This is useful because it narrows the dataset to messages sent by the compromised account, then the earliest phishing email can be found by checking timestamps.
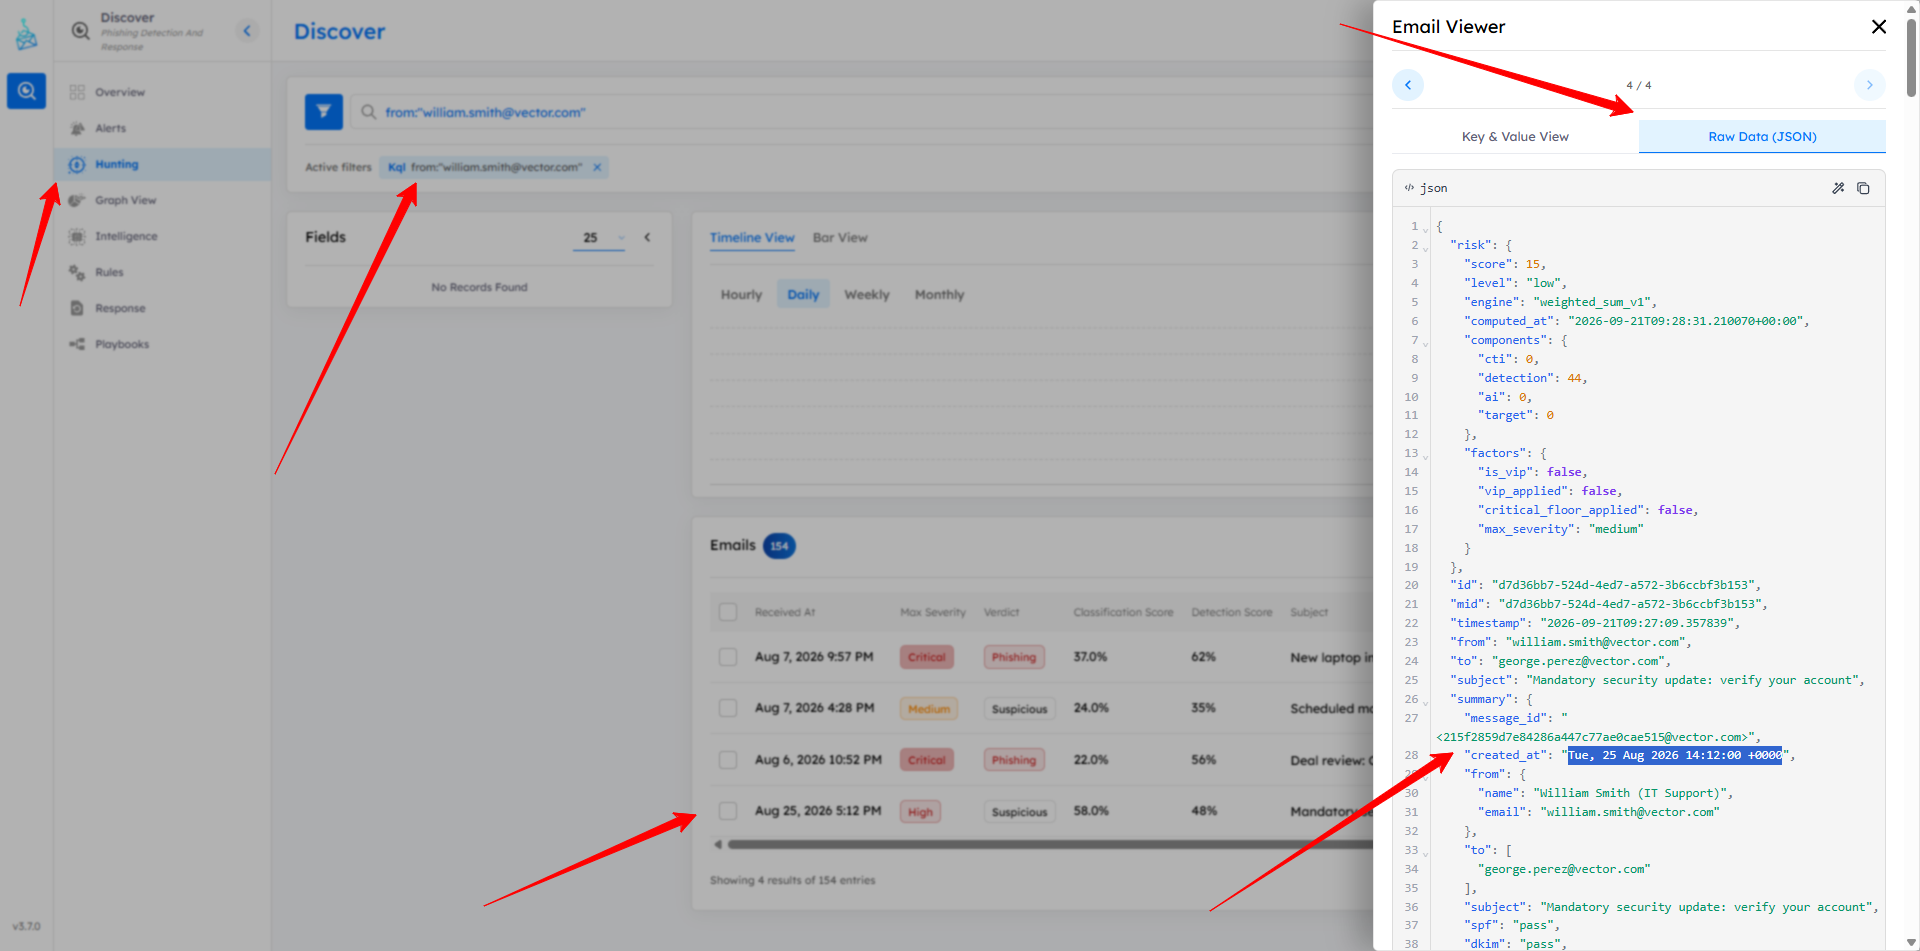
In the raw JSON view, the created_at field for the earliest phishing email was visible.
Answer: Tue, 25 Aug 2026 14:12:00 +0000
Q5 - Origin IP
The lure emails were sent by an attacker operating the mailbox remotely.
From the IP Address node, or the Received / X-Originating-IP header,
what IP address were they sent from?
For source IP questions, raw email headers are usually the best place to check. Received headers and hop data can show where the message entered the mail flow before reaching the organization.
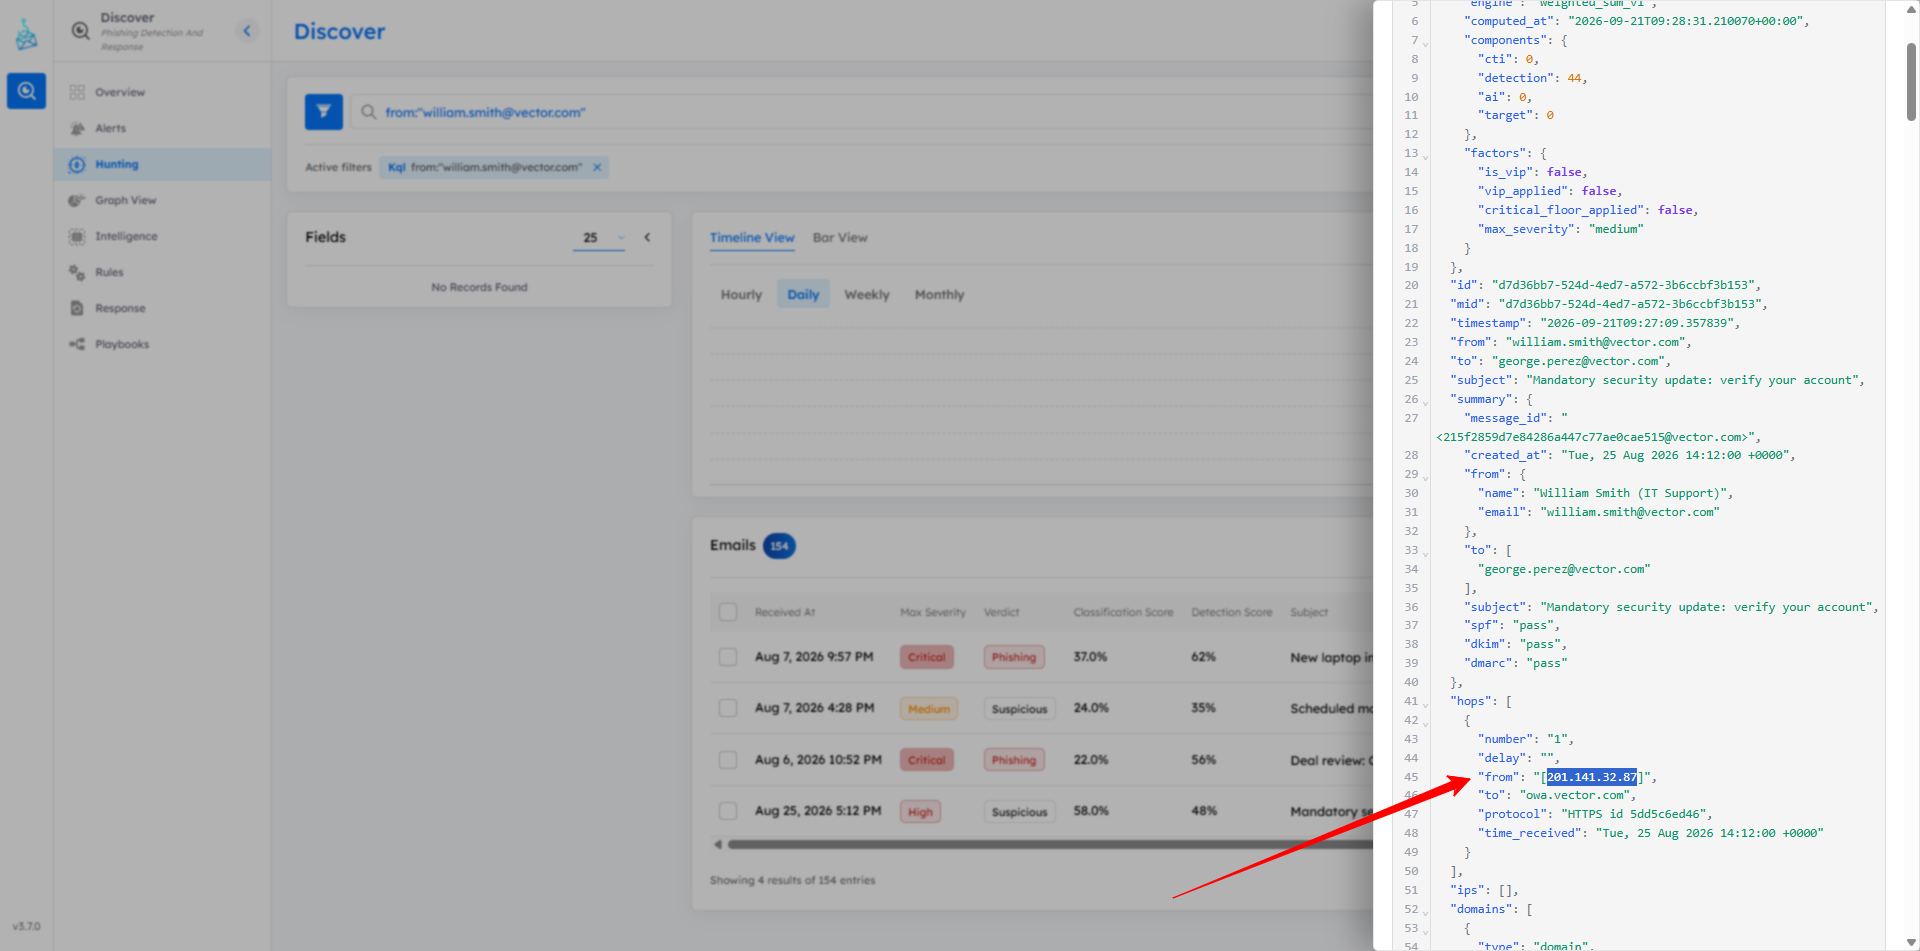
The email hop data showed the message coming from 201.141.32.87.
Answer: 201.141.32.87
Q6 - Origin country
Geo-locate that IP address.
Which country does it belong to?
After finding the IP address, I checked its geolocation. This does not prove the attacker’s real location, but it answers the CTF question and helps describe the remote access source.
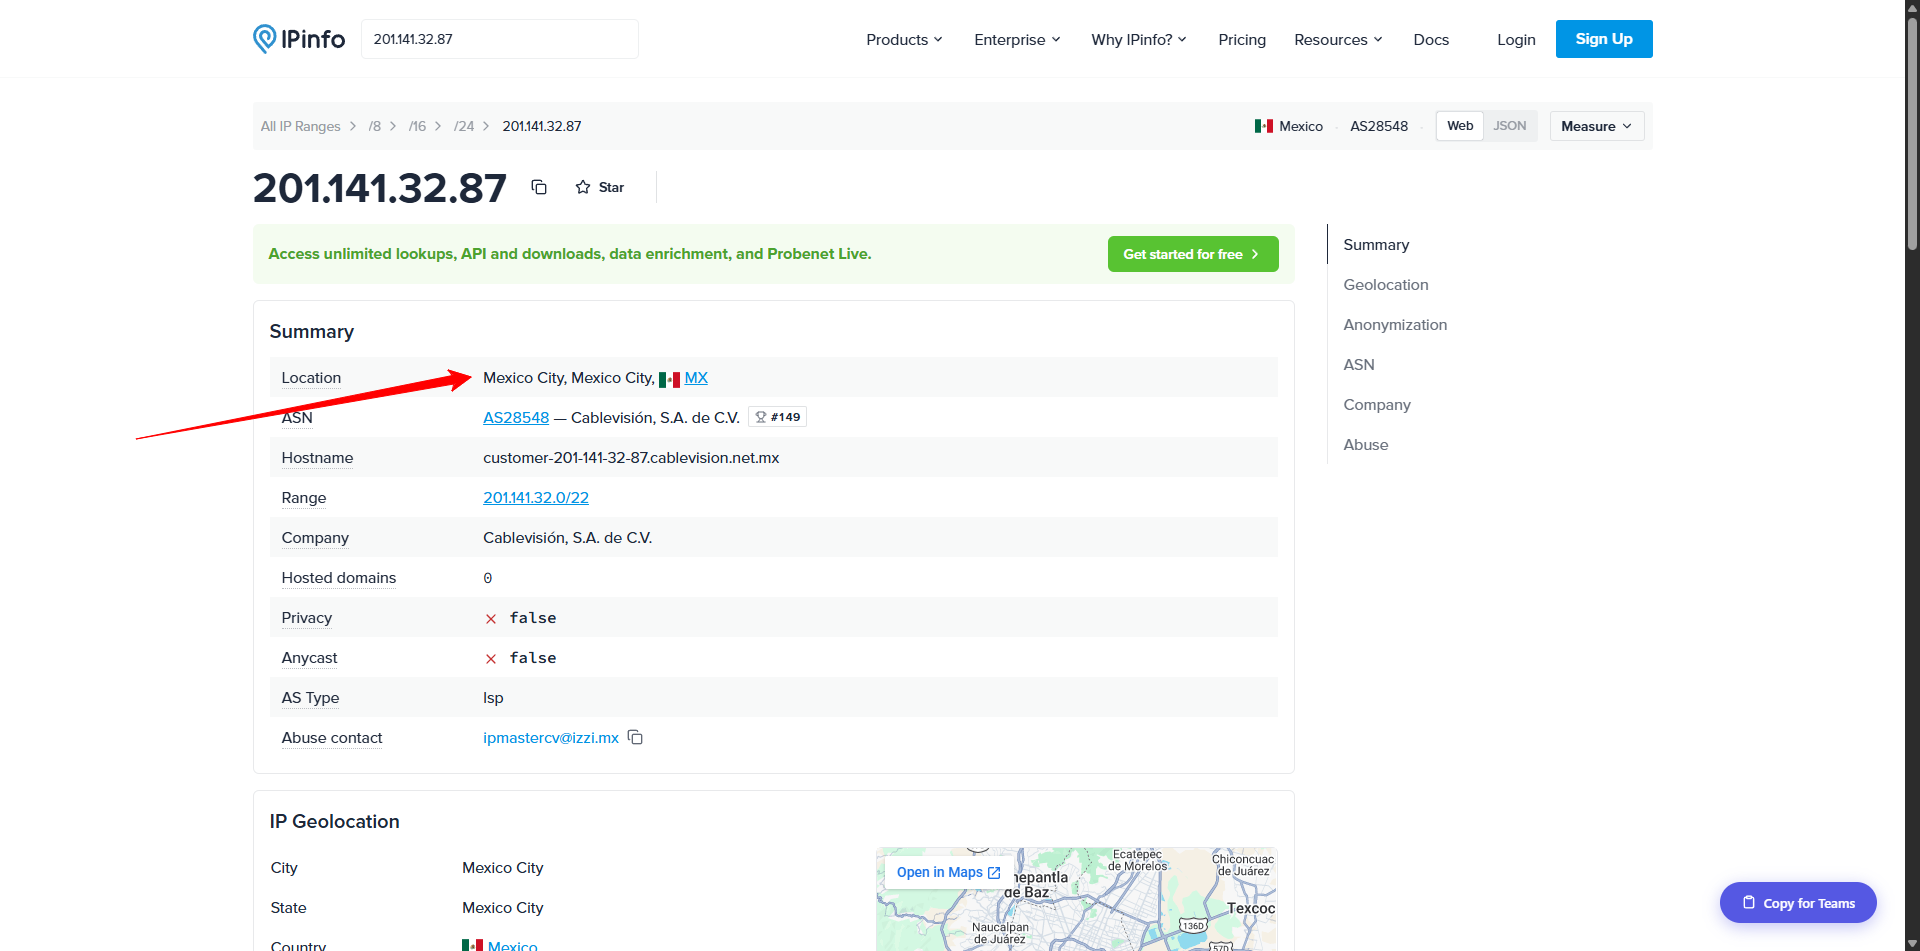
IPInfo mapped 201.141.32.87 to Mexico.
Answer: Mexico
Q7 - First recipient
Who received that very first phishing email?
Submit the full email address.
The recipient should be taken from the same earliest phishing email used for Q4. Reusing that same record keeps the timeline consistent.
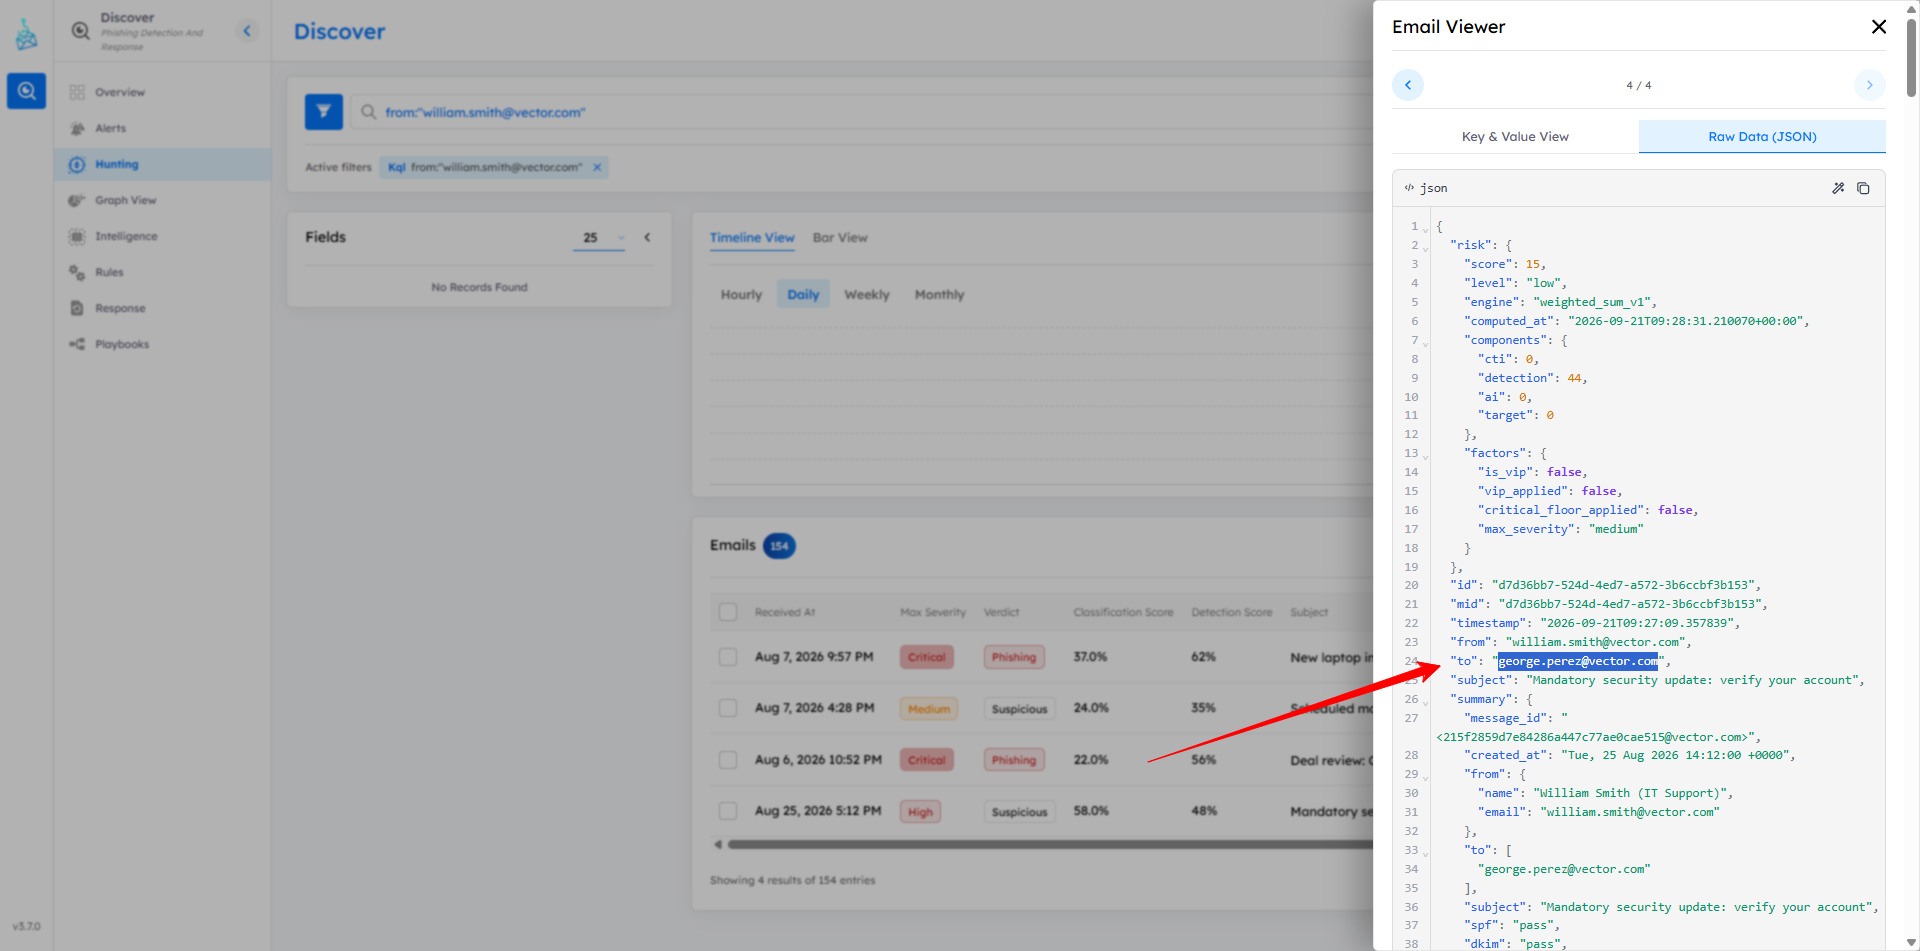
The raw JSON showed the to field as george.perez@vector.com.
Answer: george.perez@vector.com
Q8 - First email URL
Open the first phishing email and follow it to its URL node.
What is the full malicious link inside it?
Since the first email was a password reset lure, I checked the Email Content tab. This is where the user-facing link appears, and it is usually easier to read than pulling it from raw JSON.
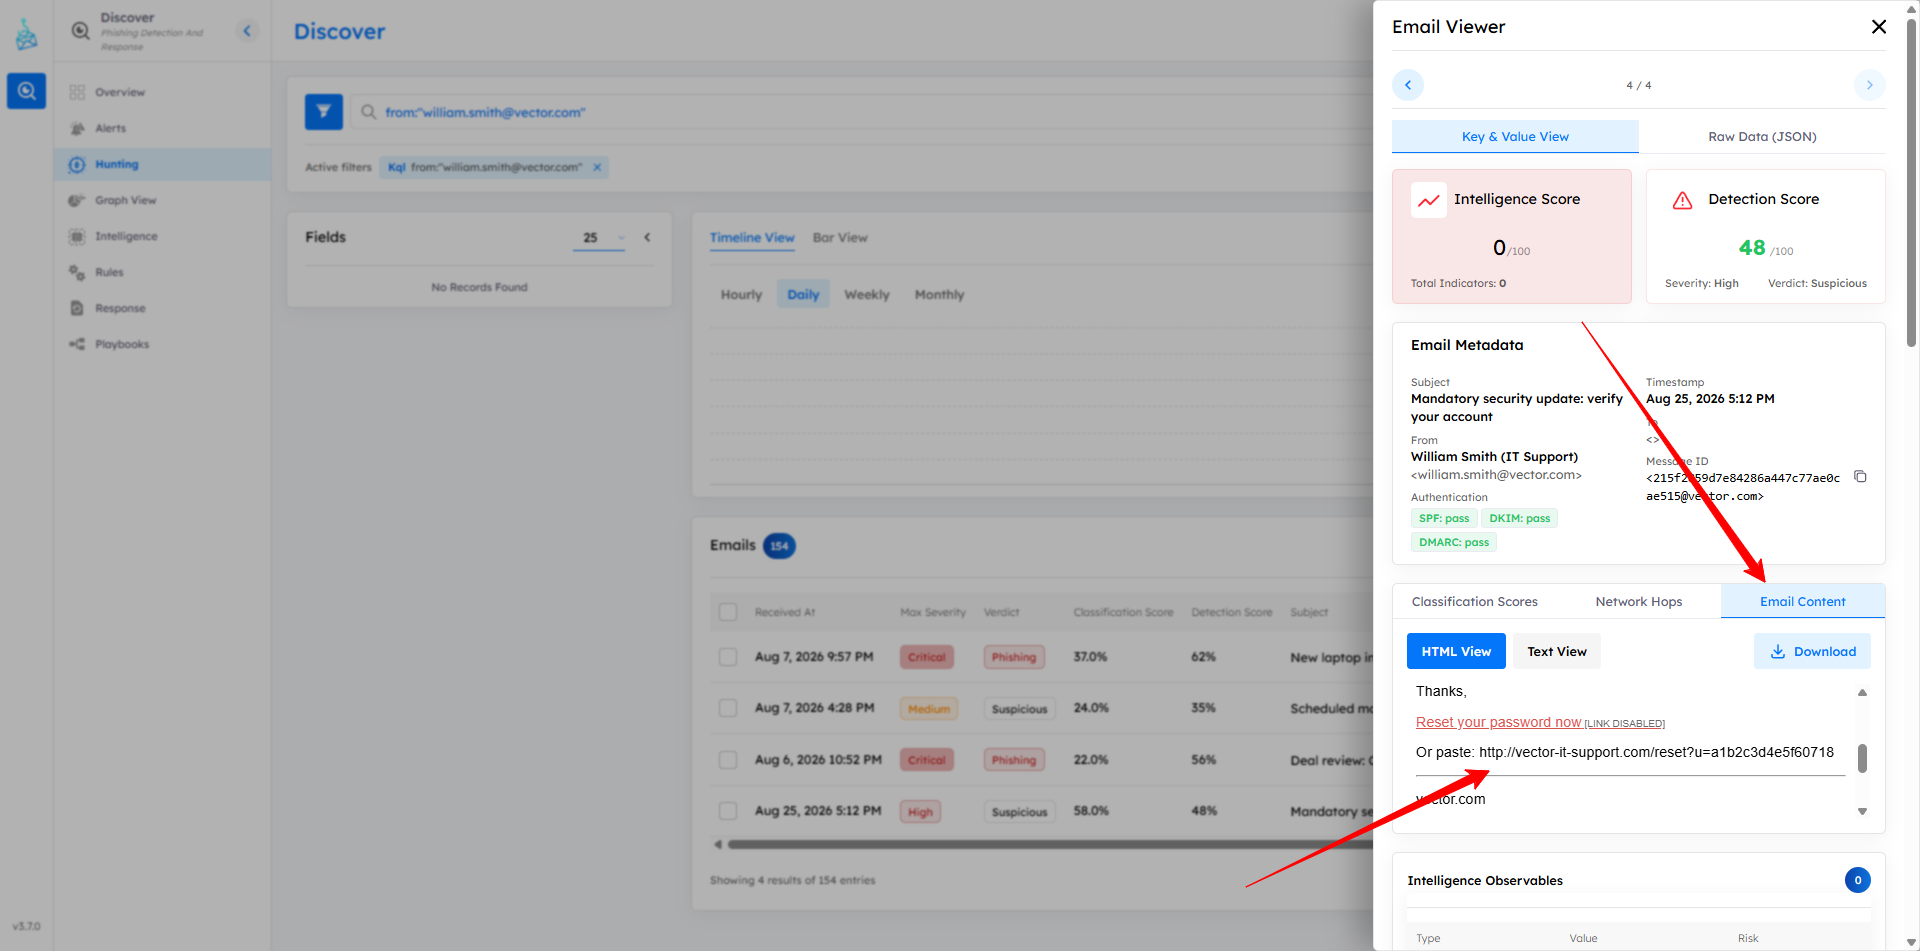
The body contained a reset link pointing to vector-it-support.com.
Answer: http://vector-it-support.com/reset?u=a1b2c3d4e5f60718
Q9 - First email domain
Which domain does that URL point to?This one comes directly from the URL in Q8. I extracted only the domain portion from the full reset link.
The full URL was http://vector-it-support.com/reset?u=a1b2c3d4e5f60718, so the domain was vector-it-support.com.
Answer: vector-it-support.com
3. Attacker Infrastructure
Q10 - Number of malicious domains
Across all the malicious links, how many DISTINCT look-alike domains are used?
Submit a number.
For this, I went back to Graph View and focused on domain nodes. Since the question asks for distinct domains, the graph is a better view than individual emails because it groups related indicators.
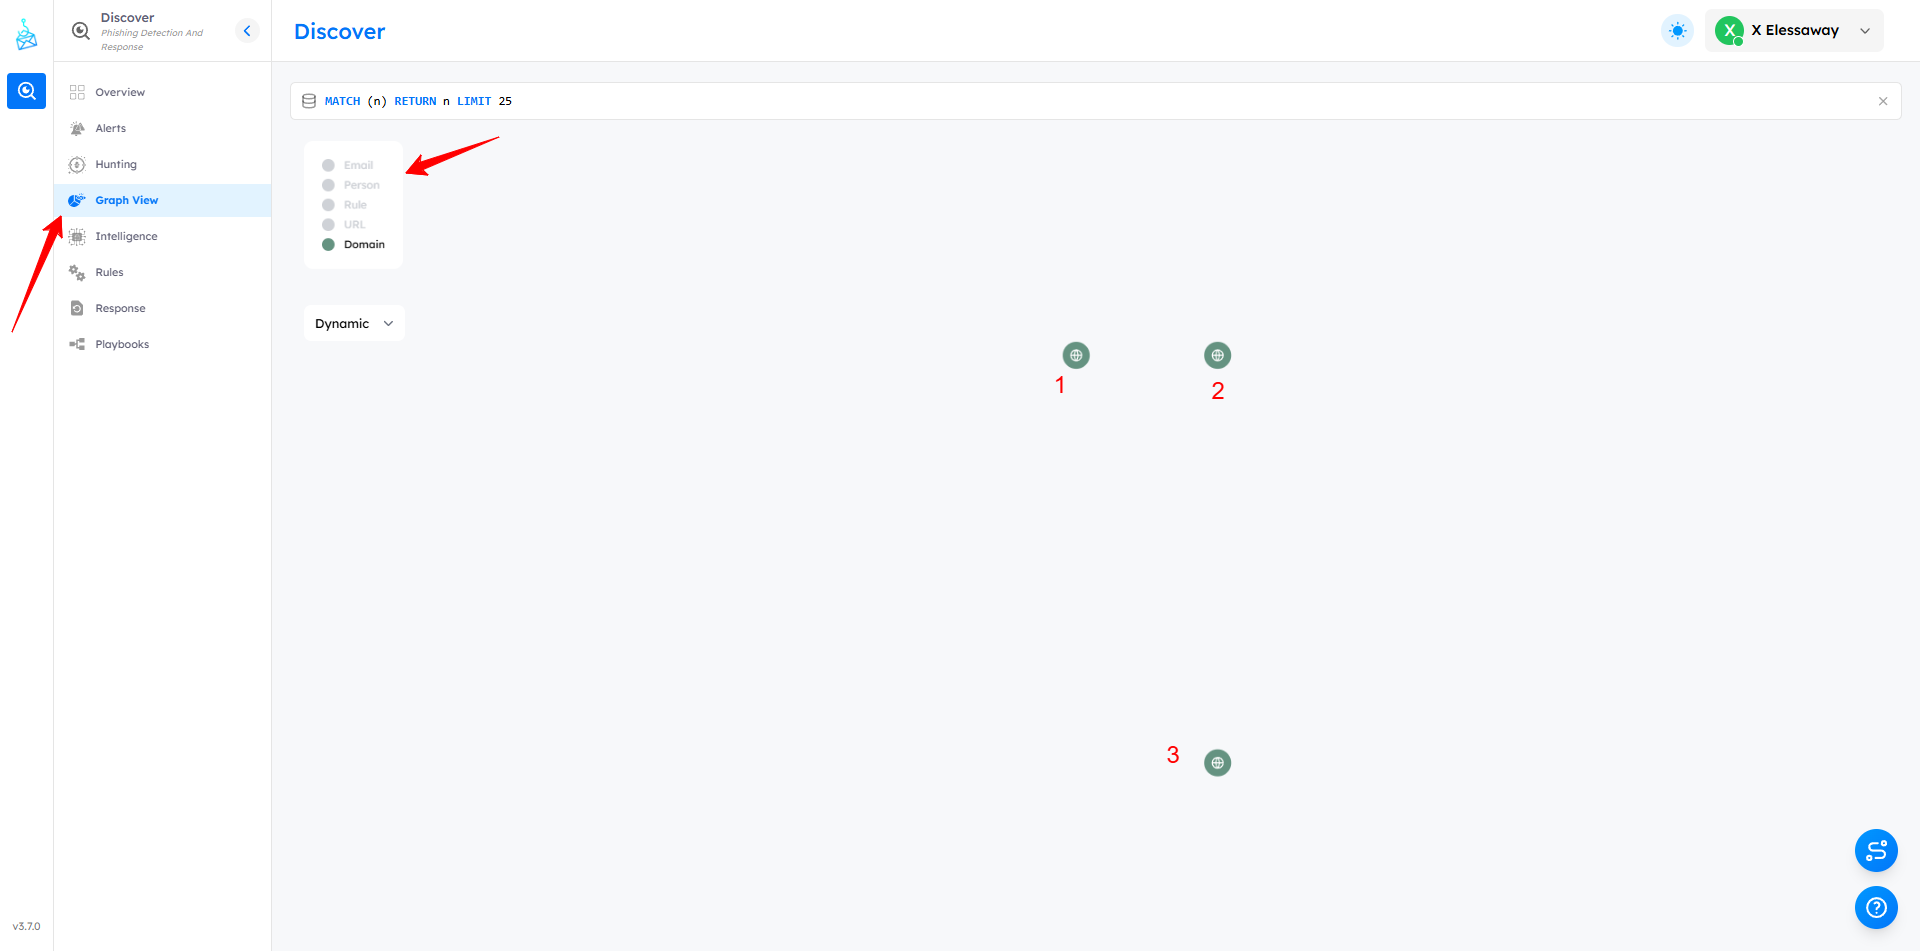
The campaign used three distinct look-alike domains.
Answer: 3
Q11 - The other look-alike domains
Besides the primary domain, name the OTHER two look-alike domains.

Answer format: all values on one line, in alphabetical order,
comma-separated, no spaces.
The primary domain from the first email was vector-it-support.com, so I needed the other two domains from the same campaign. Filtering/searching around the phishing subject in Graph View exposed the remaining domain nodes.
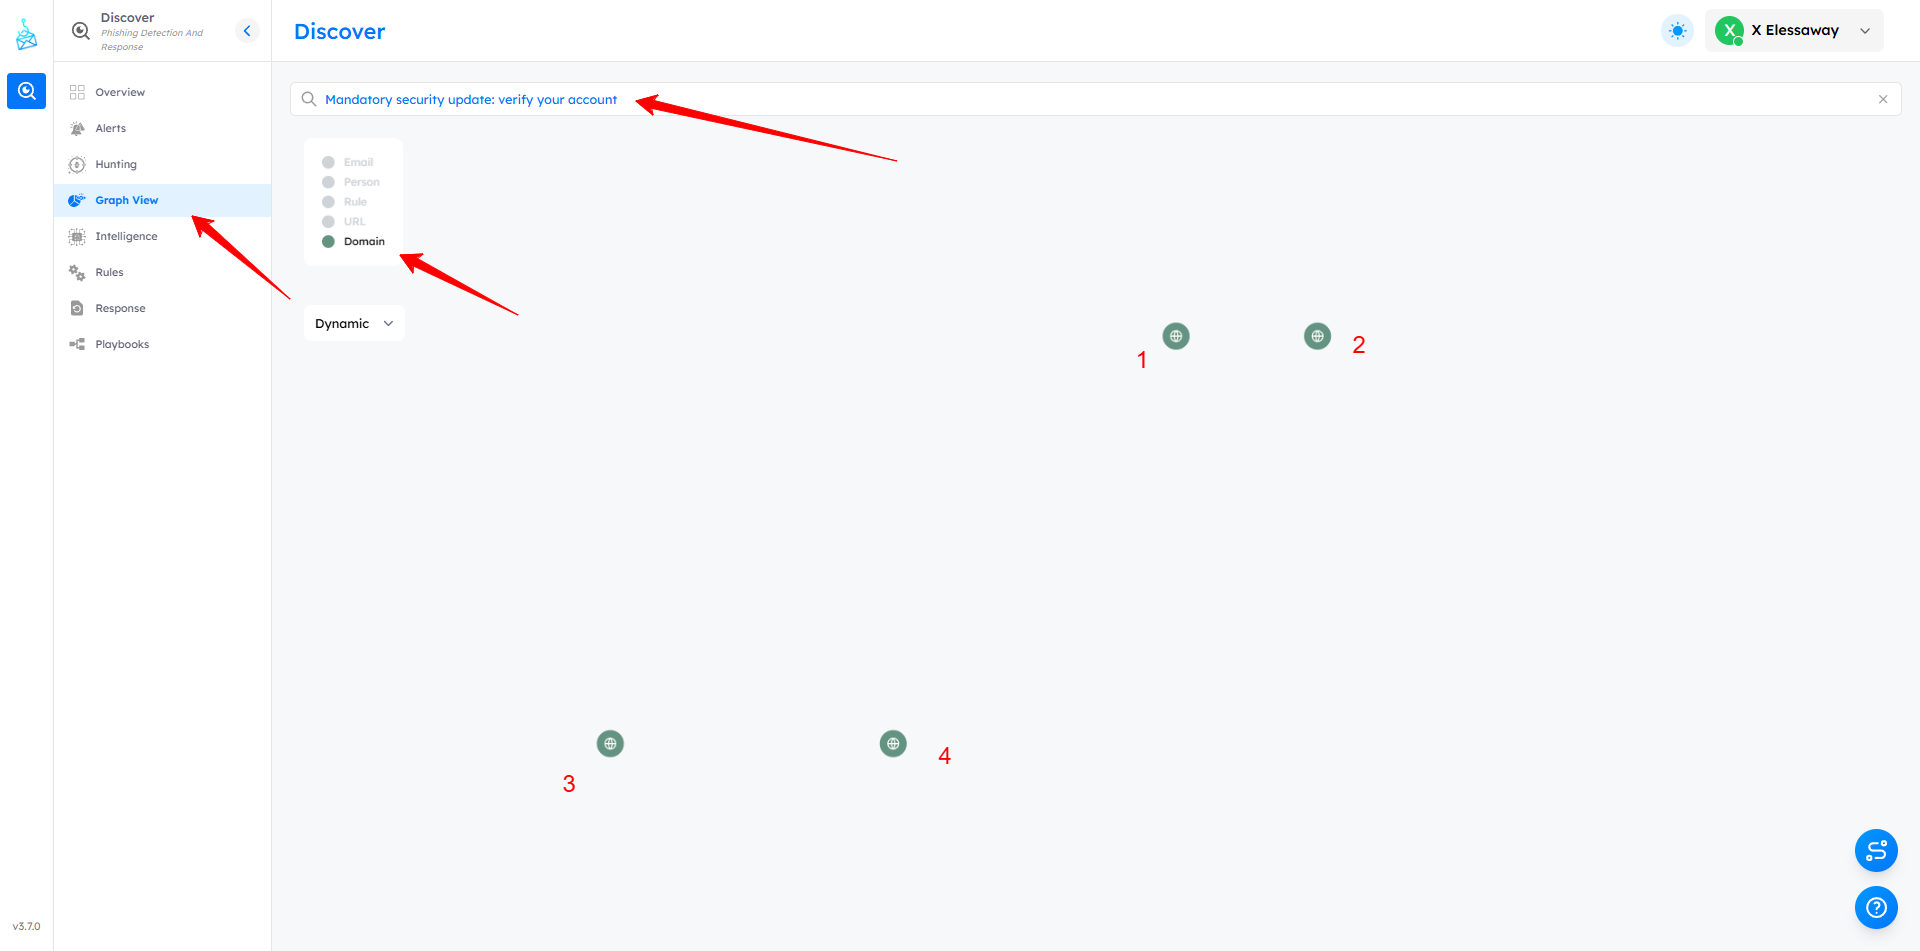
The other two look-alike domains were submitted in alphabetical order with no spaces.
Answer: vector-secure-reset.com,vectorhelpdesk-online.com
Q12 - Classification explanation
For the earliest phishing email, what classification explanation is shown
in the Rule Engine Explanations?
The card title was a little misleading, so I followed the prompt itself. I opened the earliest phishing email and checked the Classification Scores section because that is where the rule engine explanations are shown.
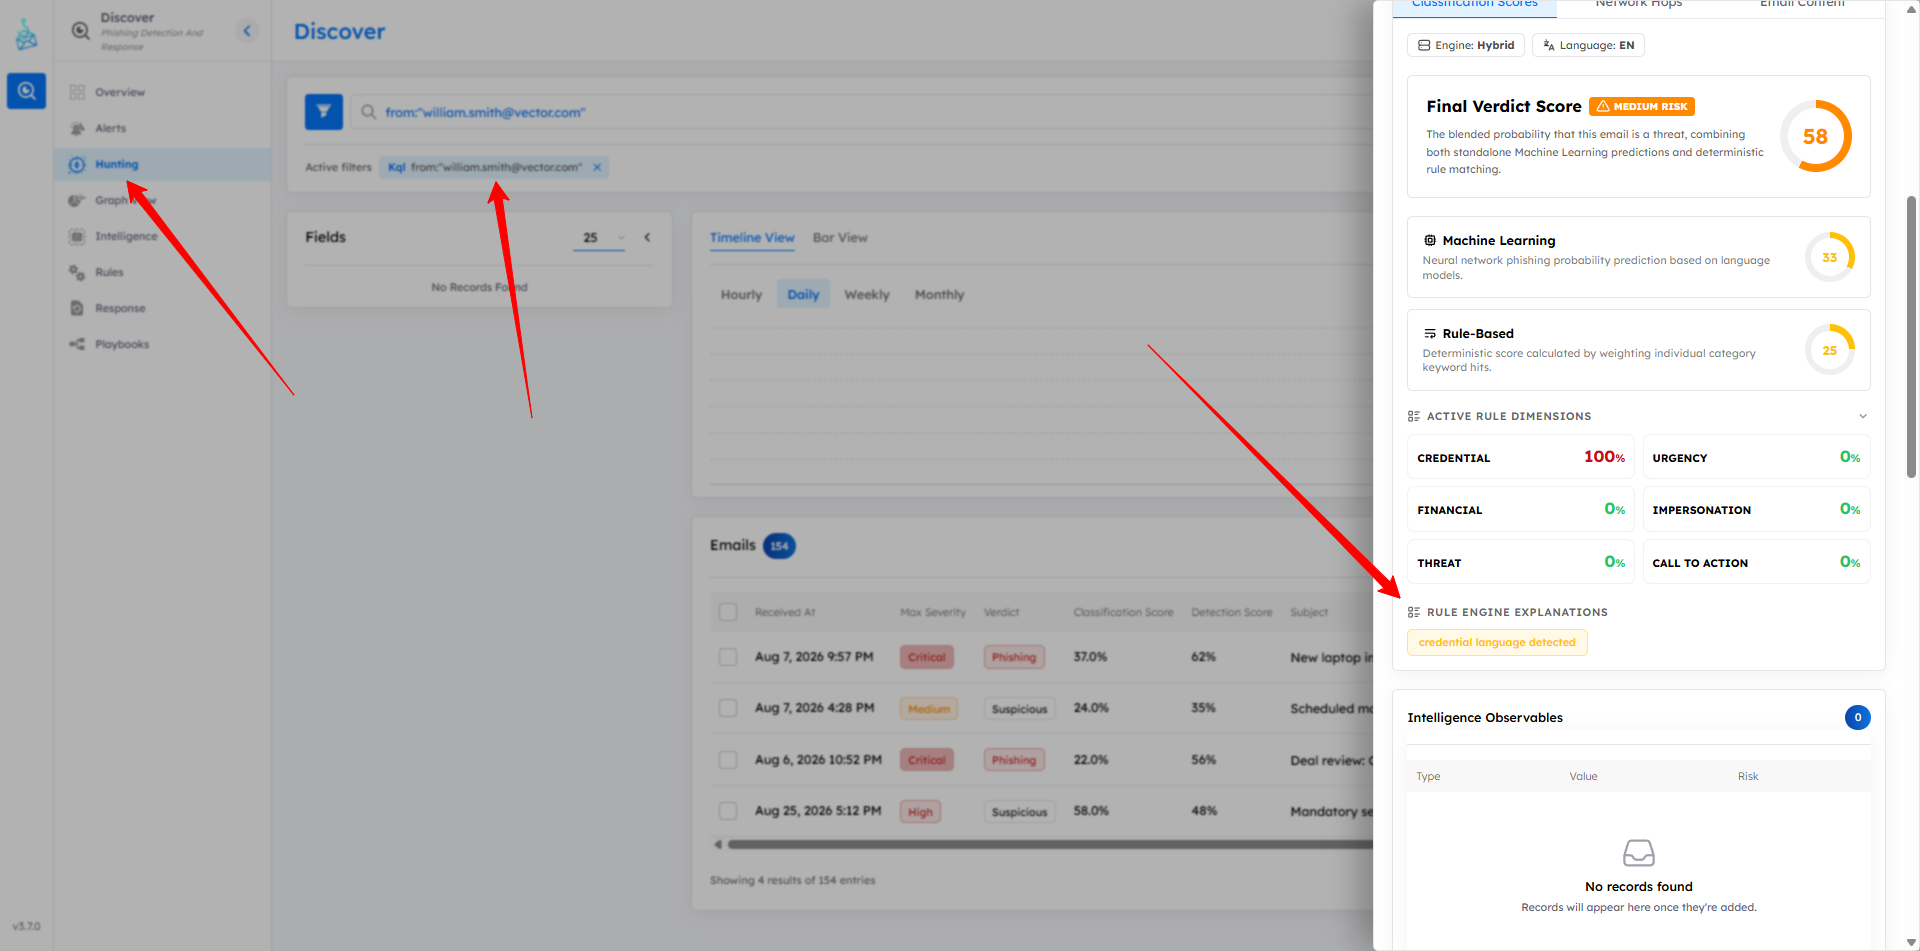
The rule explanation matched the lure content: the email was using credential reset language.
Answer: credential language detected
4. Malicious Attachment
Q13 - Malicious script filename
Shortly after the first email, the account sent a mail asking recipients
to run an attached "updater" script.
What is the filename of that .ps1 attachment?
The question hints at an updater script, so I searched the sender’s emails for updater-related messages. The email content clearly asked users to run a PowerShell attachment.
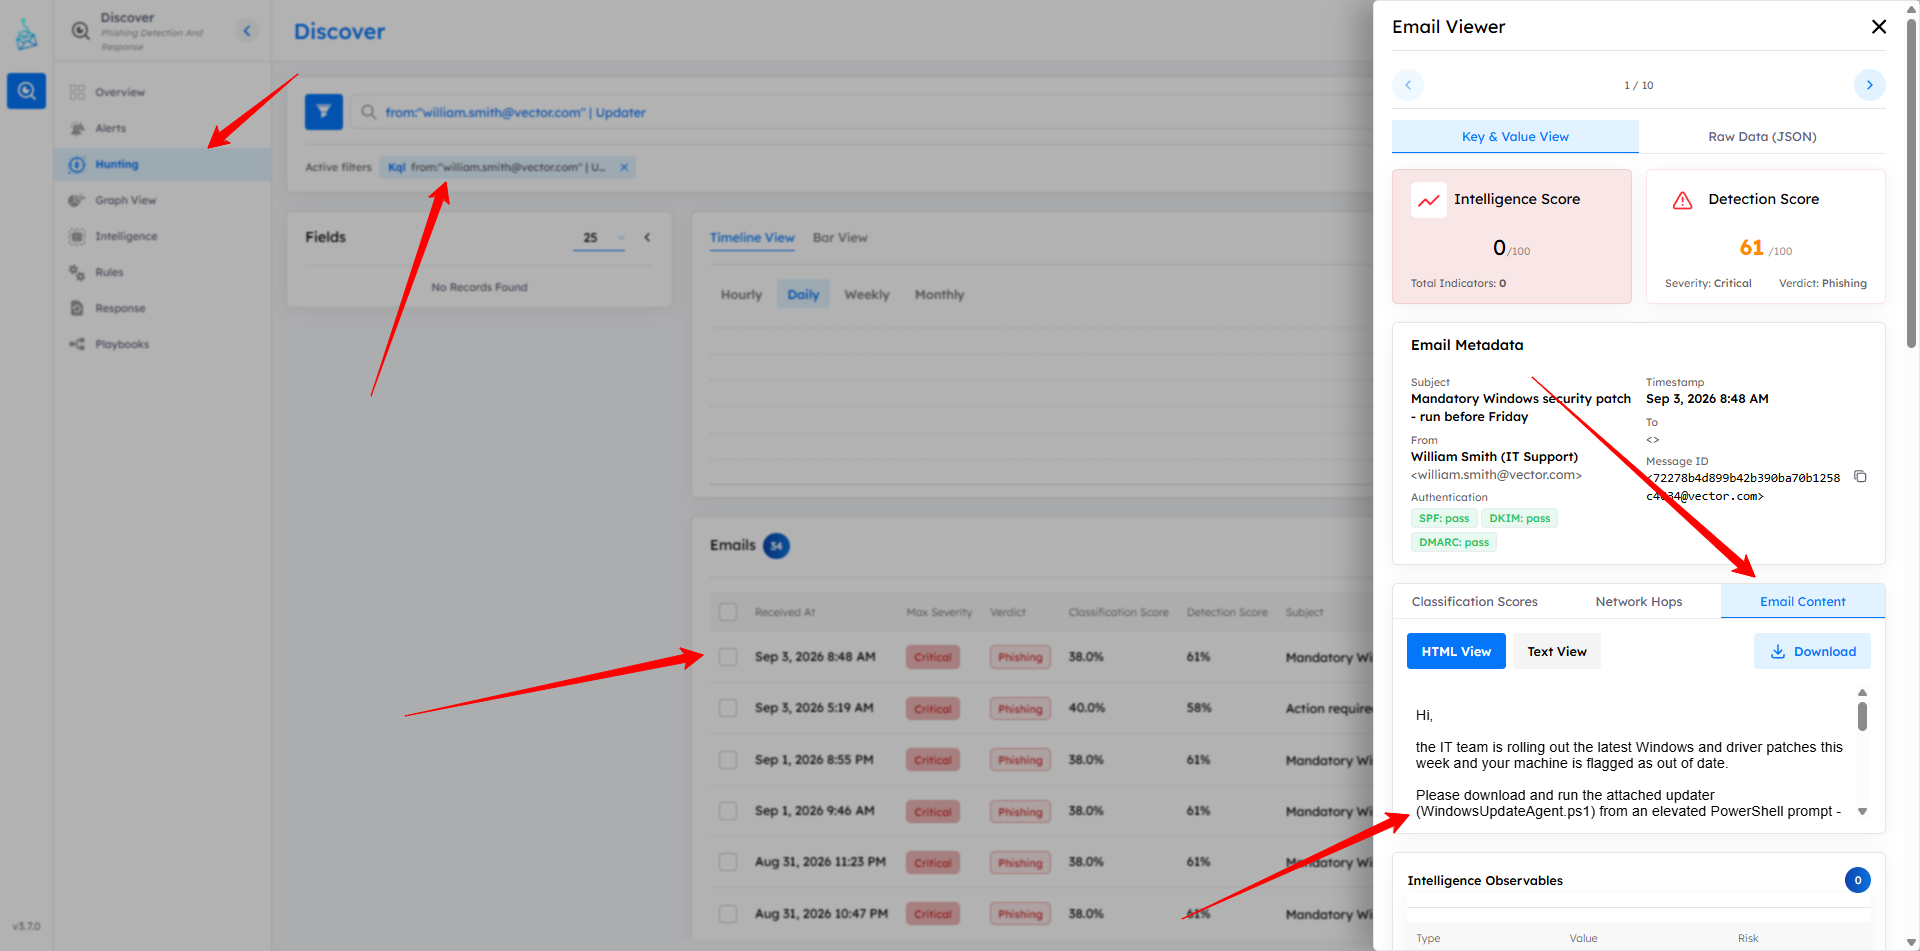
The filename shown in the email body was WindowsUpdateAgent.ps1.
Answer: WindowsUpdateAgent.ps1
Q14 - Script MD5
Open the File Hash node for that script.
What is its MD5 hash?
After finding the attachment, I opened the file scan/hash details. Hash values are better taken from the file analysis panel because it avoids mistakes from manually hashing the wrong downloaded artifact.
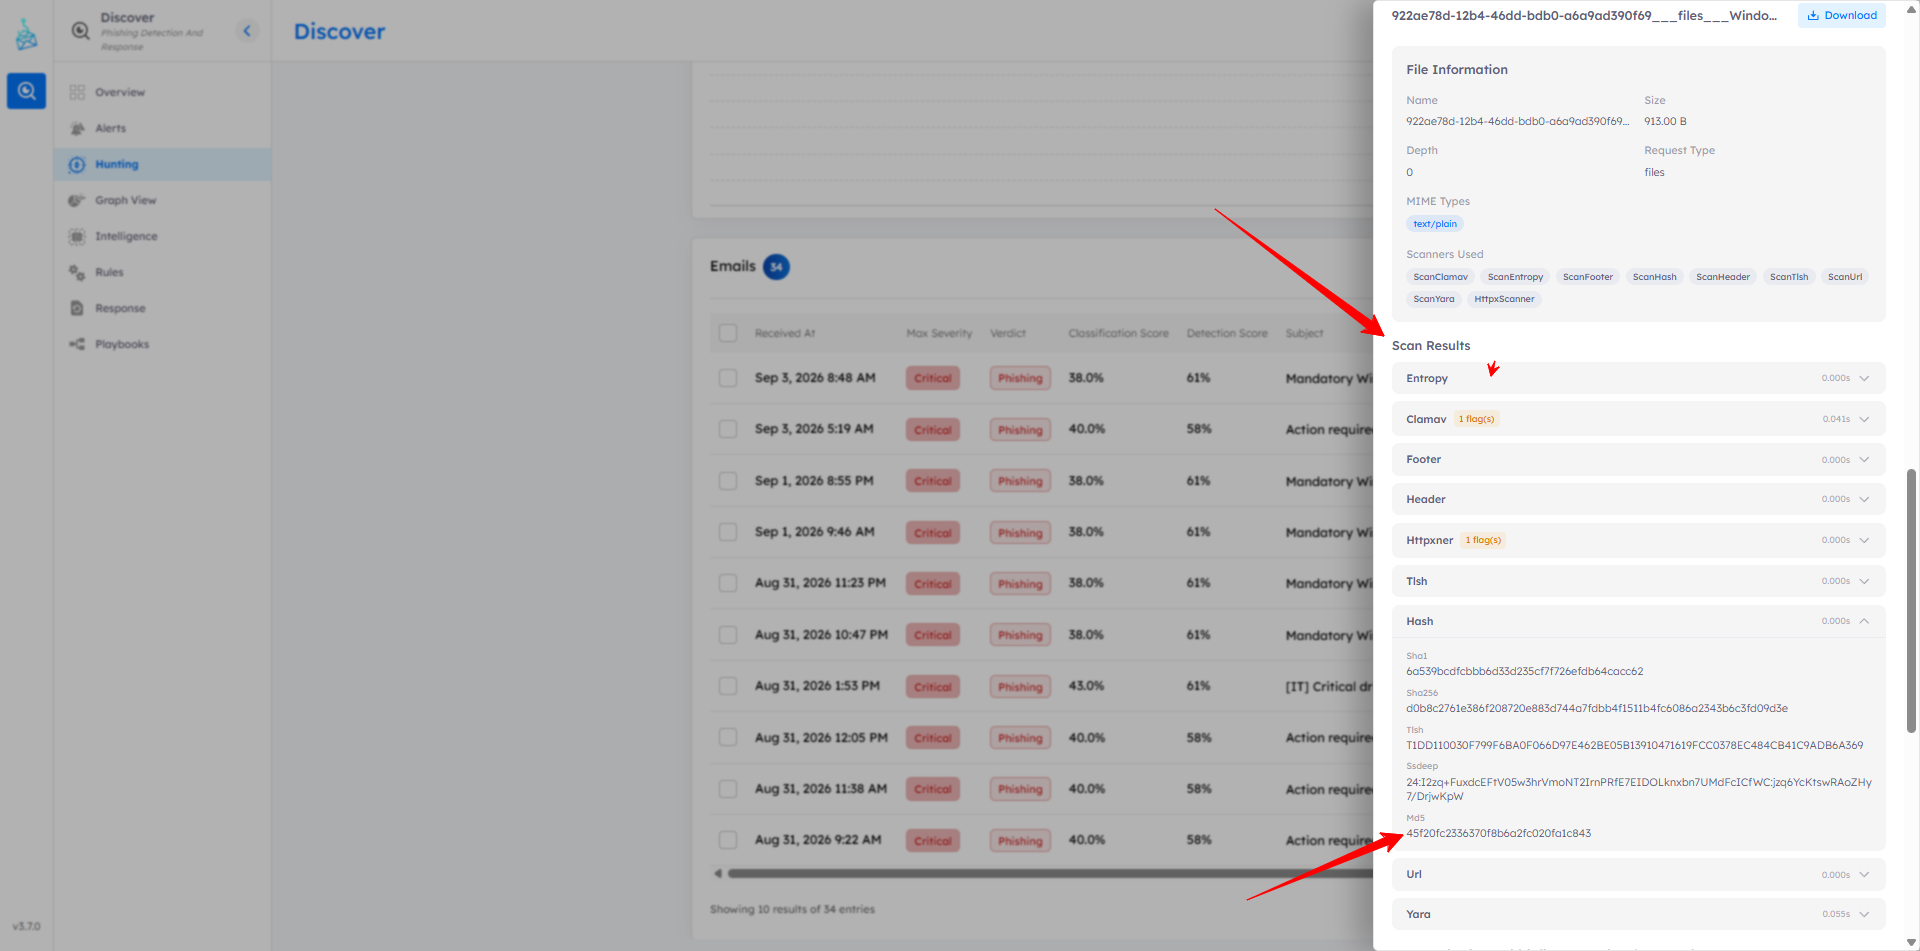
The MD5 field in the scan results showed the value.
Answer: 45f20fc2336370f8b6a2fc020fa1c843
Q15 - Script SHA256
What is the SHA256 hash of that same script?This was in the same file scan results as the MD5. I expanded the Hash section and used the SHA256 value from there.
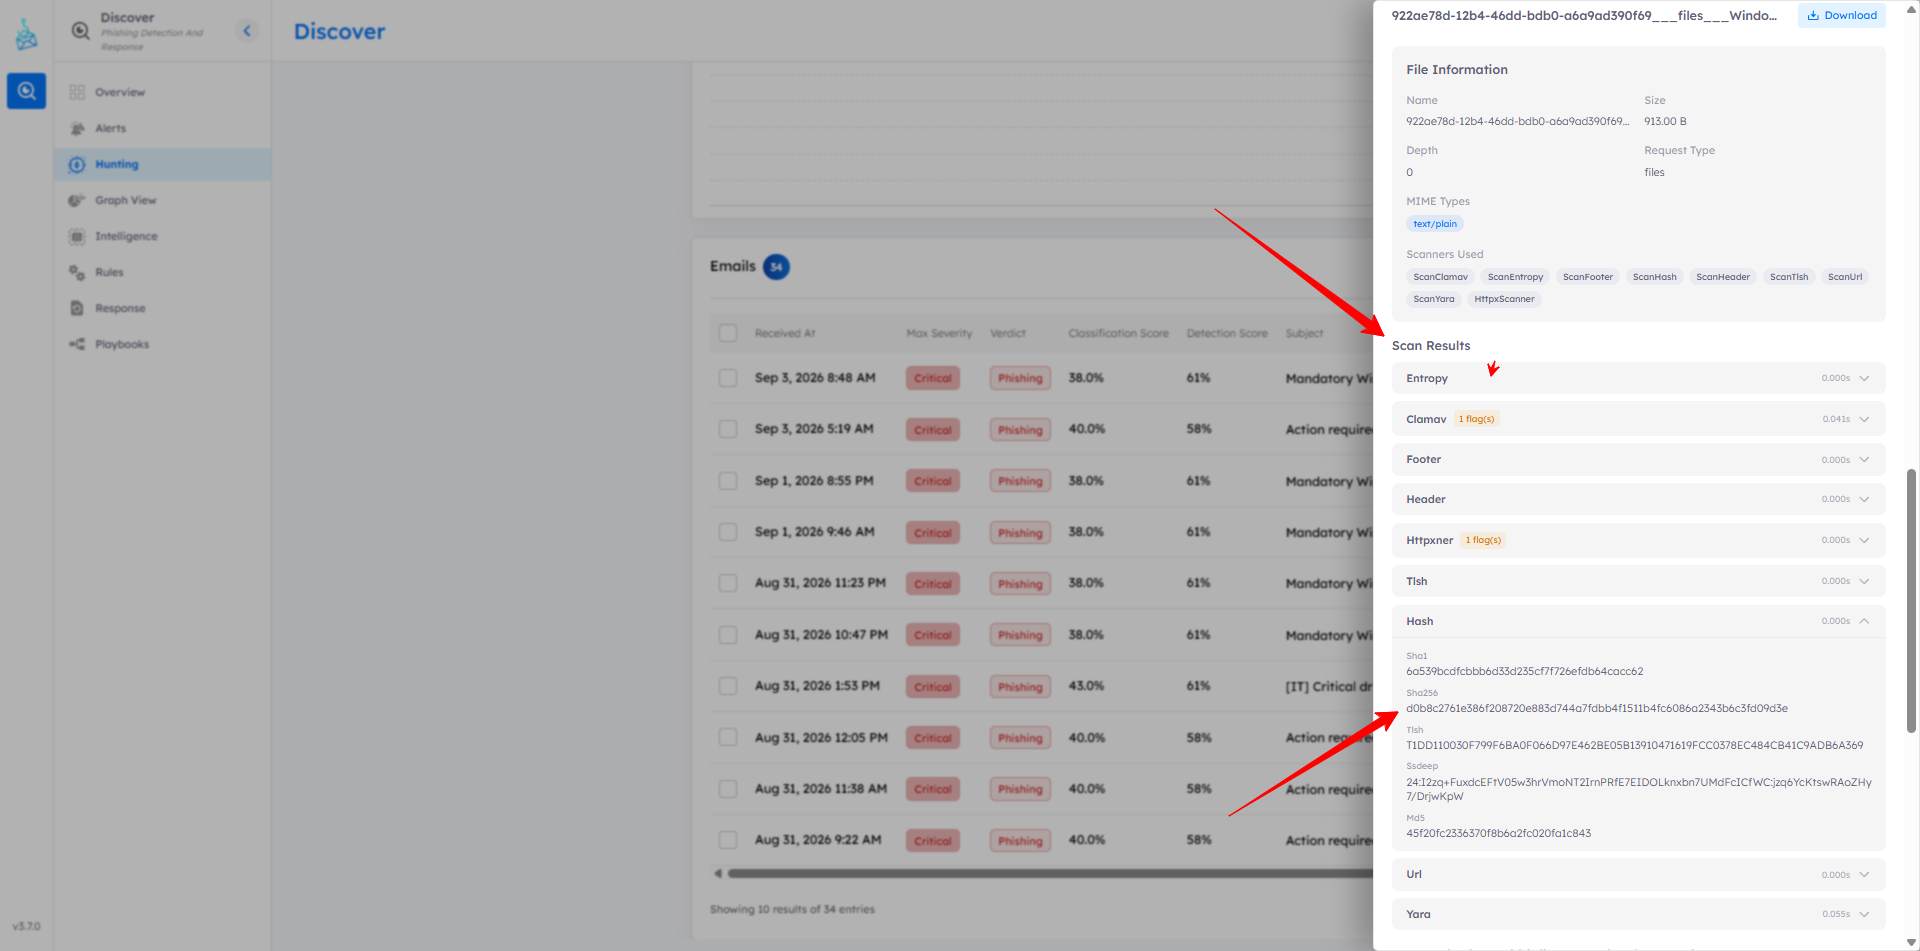
Answer: d0b8c2761e386f208720e883d744a7fdbb4f1511b4fc6086a2343b6c3fd09d3e
Q16 - Script capability
Review the suspicious YARA rule matches for the script.
What suspicious YARA rule was triggered?
Since the file was a PowerShell script, I checked the YARA scan results for behavioral clues. This is useful because YARA matches often summarize what a file appears to do, even before deeper reverse engineering.
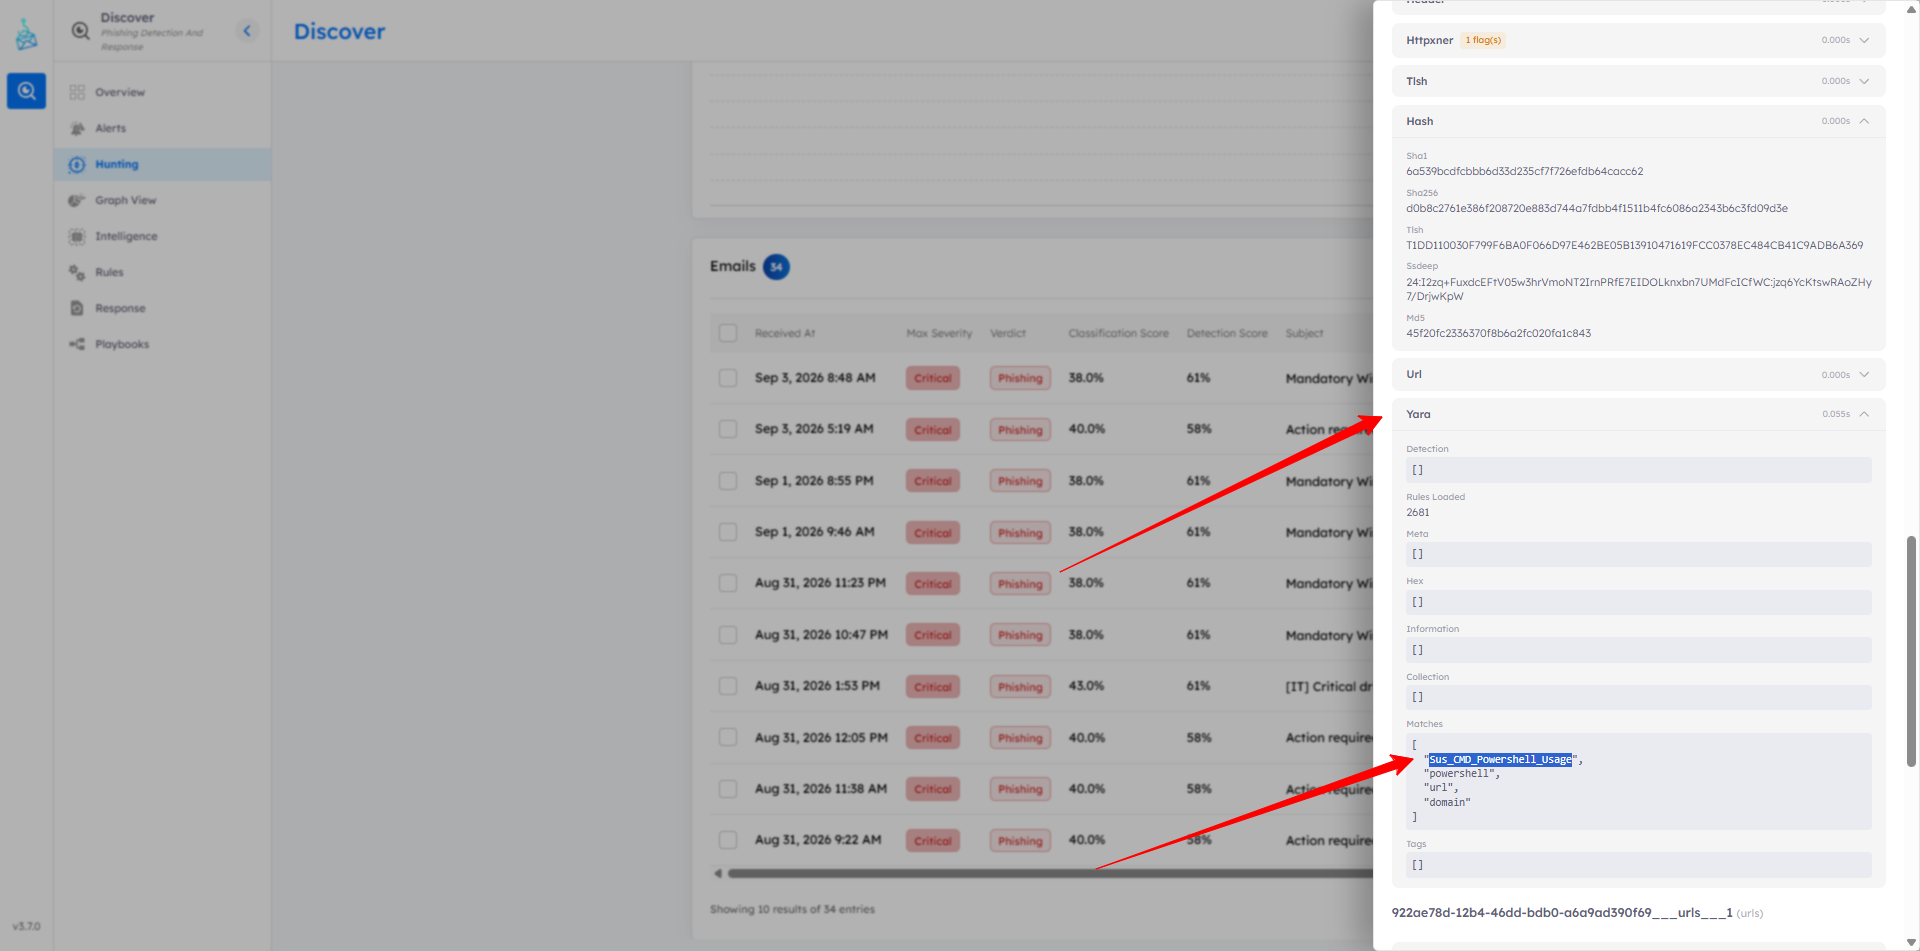
The YARA matches included Sus_CMD_Powershell_Usage, with related terms like powershell, url, and domain.
Answer: Sus_CMD_Powershell_Usage
5. Lateral Movement and Response
Q17 - Detection rule
Attachments matching a YARA rule are detected by a specific Detection Rule.
What is the name of that Detection Rule?
My first thought was to find this from Discover, but another route was cleaner. I went to the Rules page and looked at rules sorted by total matches. Since the suspicious file matched a YARA rule and the question asks about attachment detection, the logical rule was the one tied to attachment YARA matches.
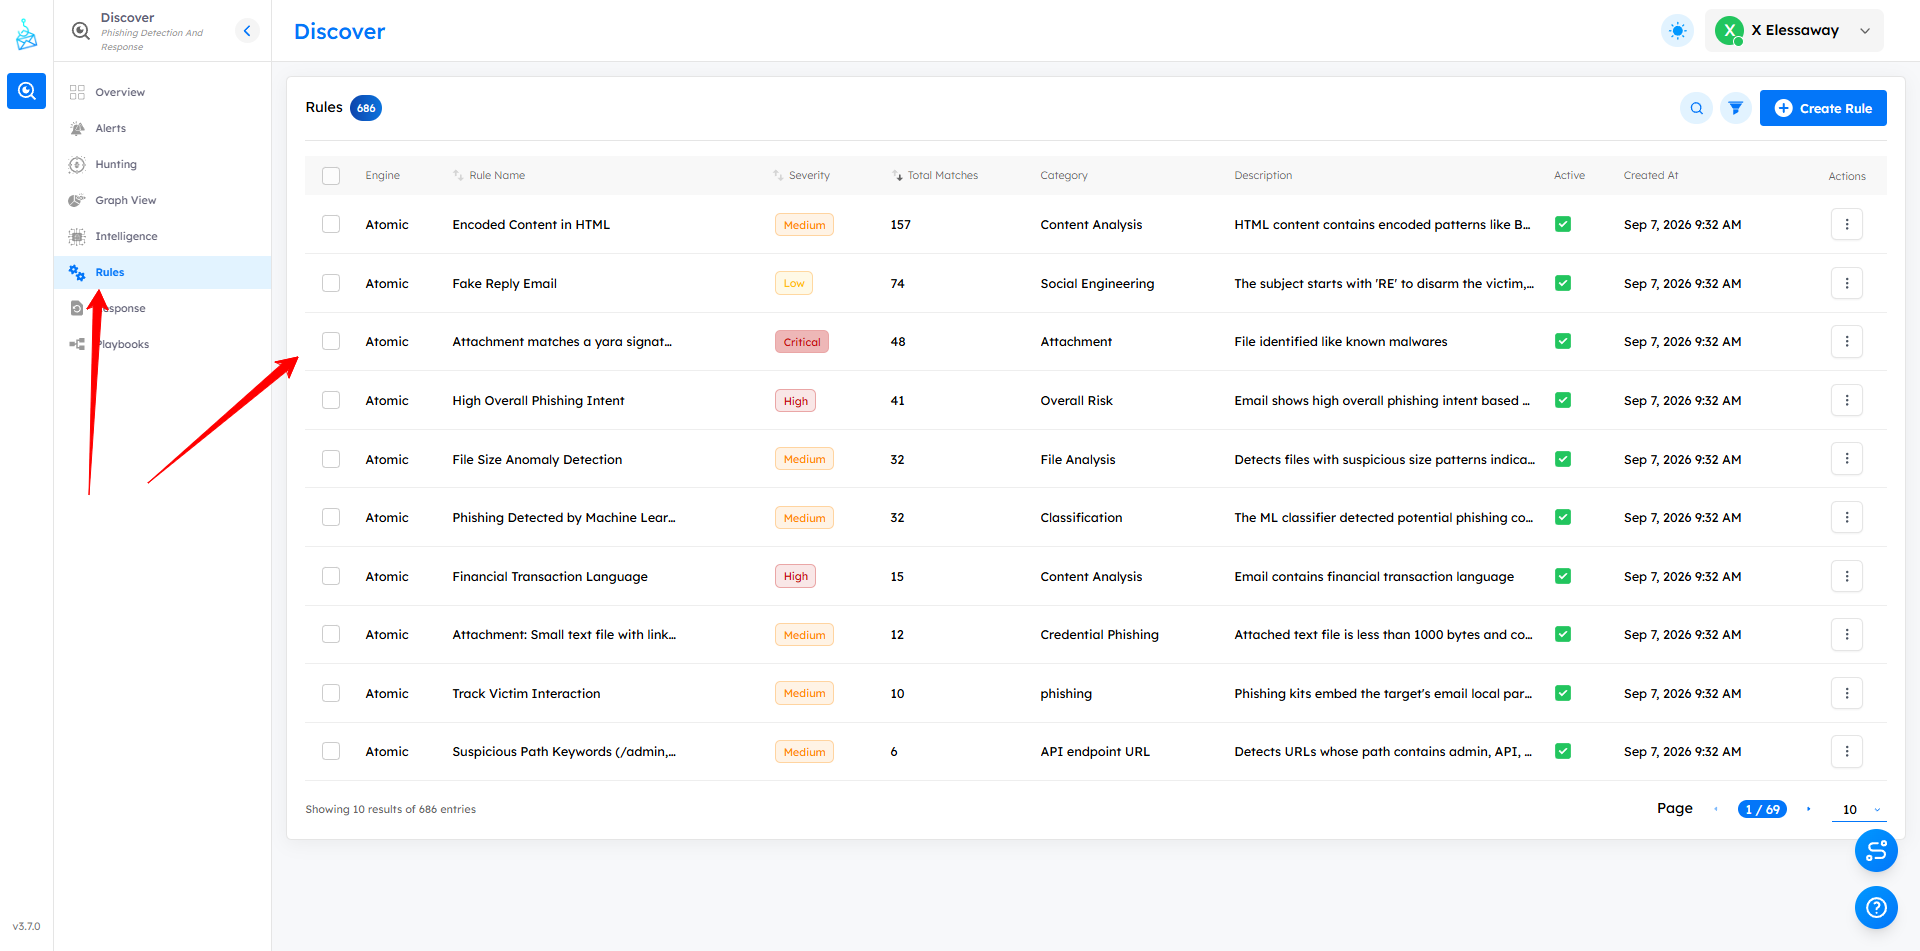
The rule Attachment matches a yara signature was in the Attachment category, had critical severity, and matched the script evidence.
Answer: Attachment matches a yara signature
Q18 - Reply-To count
The attacker used an email address to collect victims' replies,
which was later added to the TIP as an IOC.
How many emails contain this address in their Reply-To field?
I handled this in two steps. First, I needed to identify the reply collection address. Since the question says it was added to the TIP as an IOC, the Intelligence tab was the right place to search. I filtered for email indicators related to Vector.
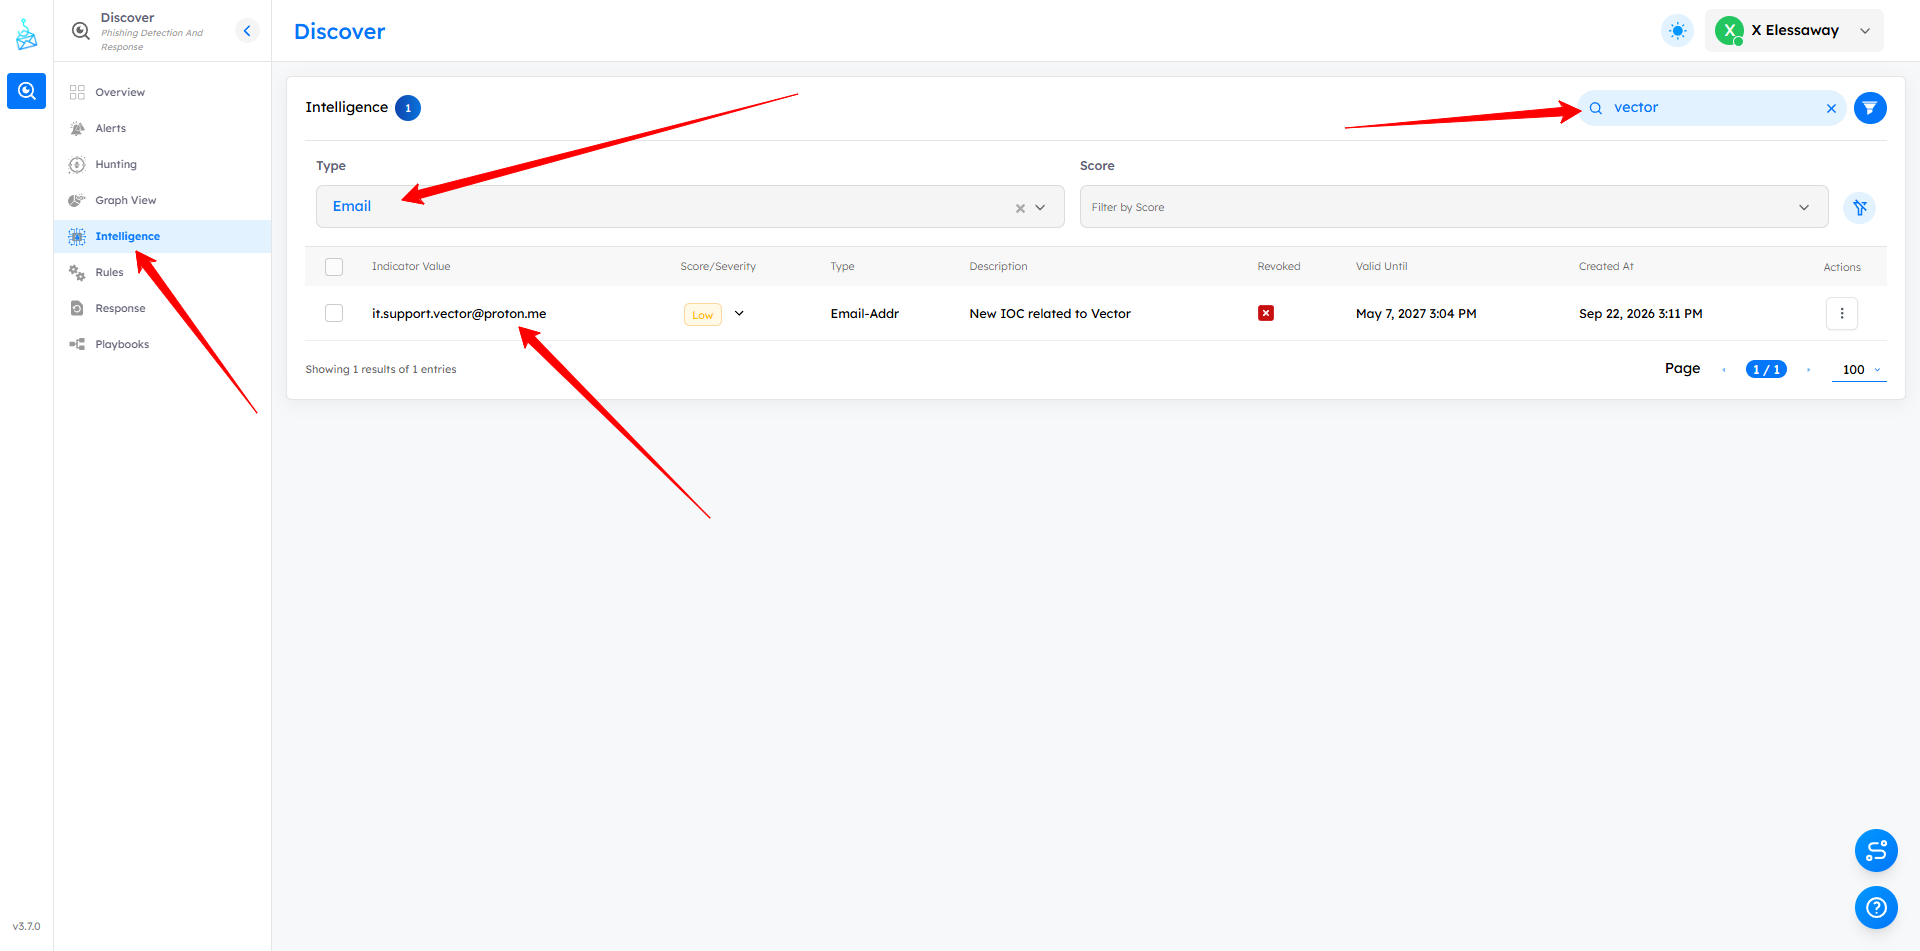
That produced one relevant email IOC: it.support.vector@proton.me.
Then I pivoted back to Hunting and searched for that email address. This gave the number of emails containing it in the dataset.
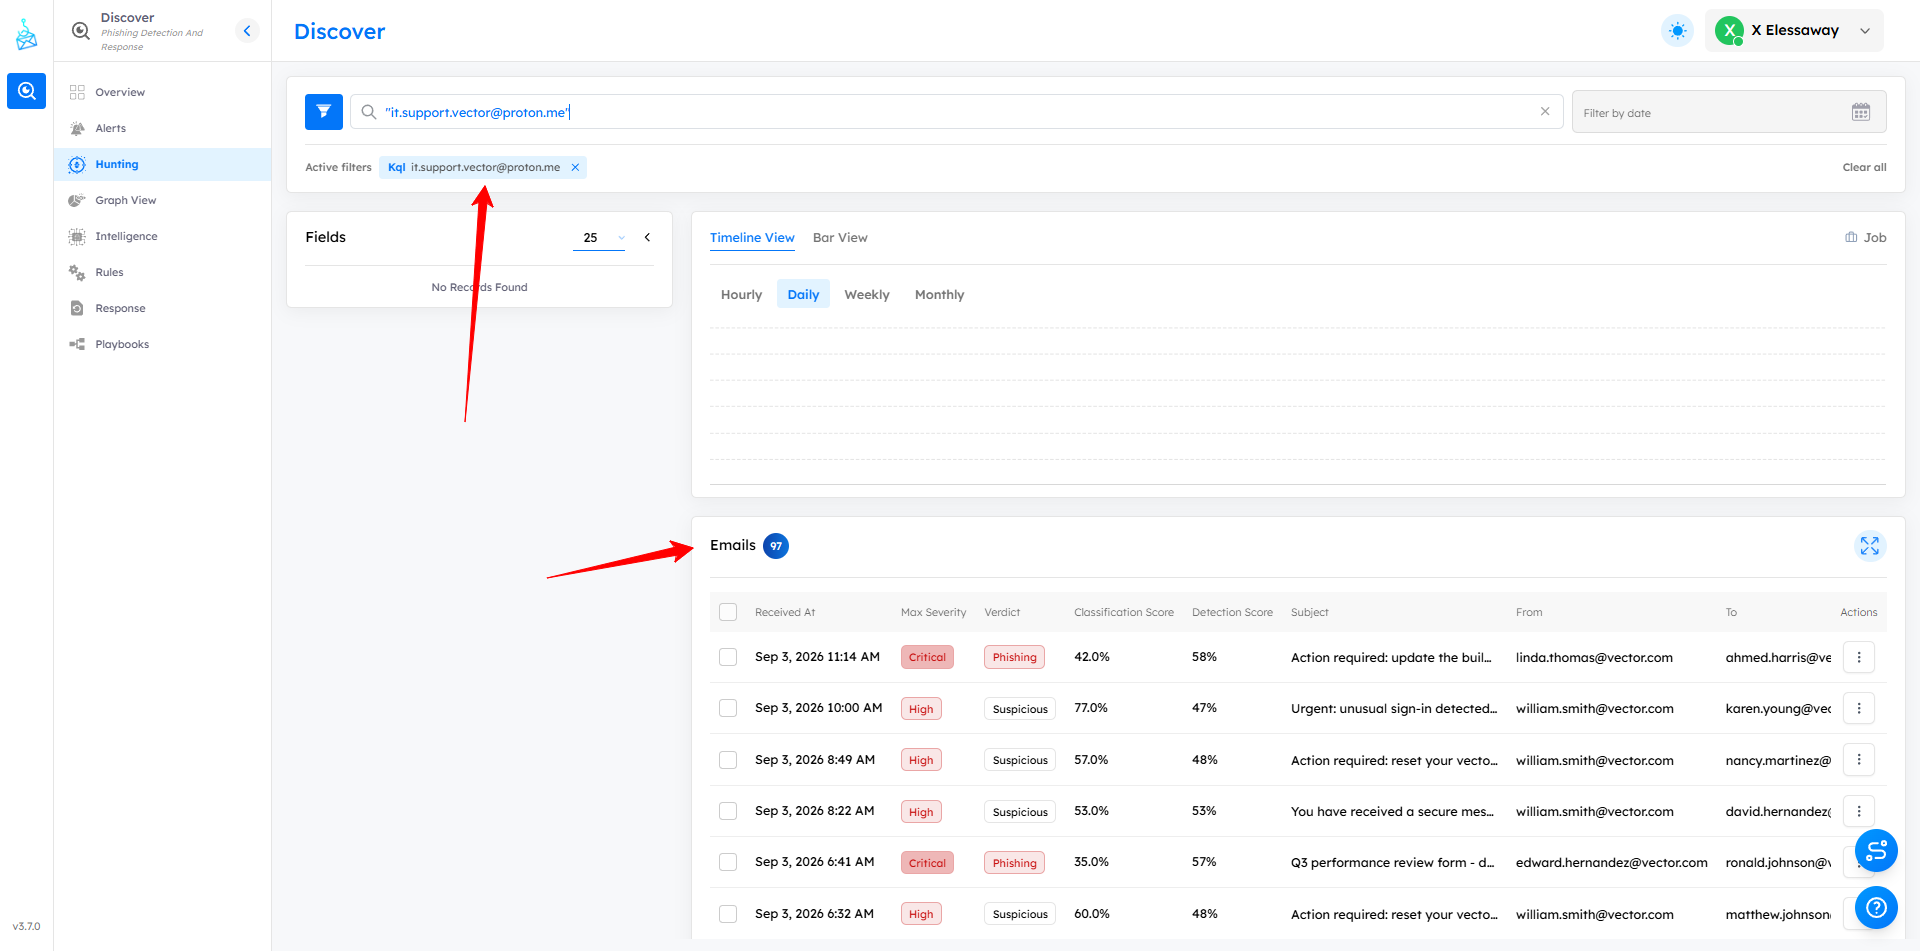
The Hunting results showed 97 matching emails.
Answer: 97
Q19 - Response modules
Across how many Response Integration Modules were Response Actions executed?
Submit a number.
The Response page summarizes automation and integrations, so it was the right place to answer this. I checked the Response By Module chart and counted the distinct modules with actions.
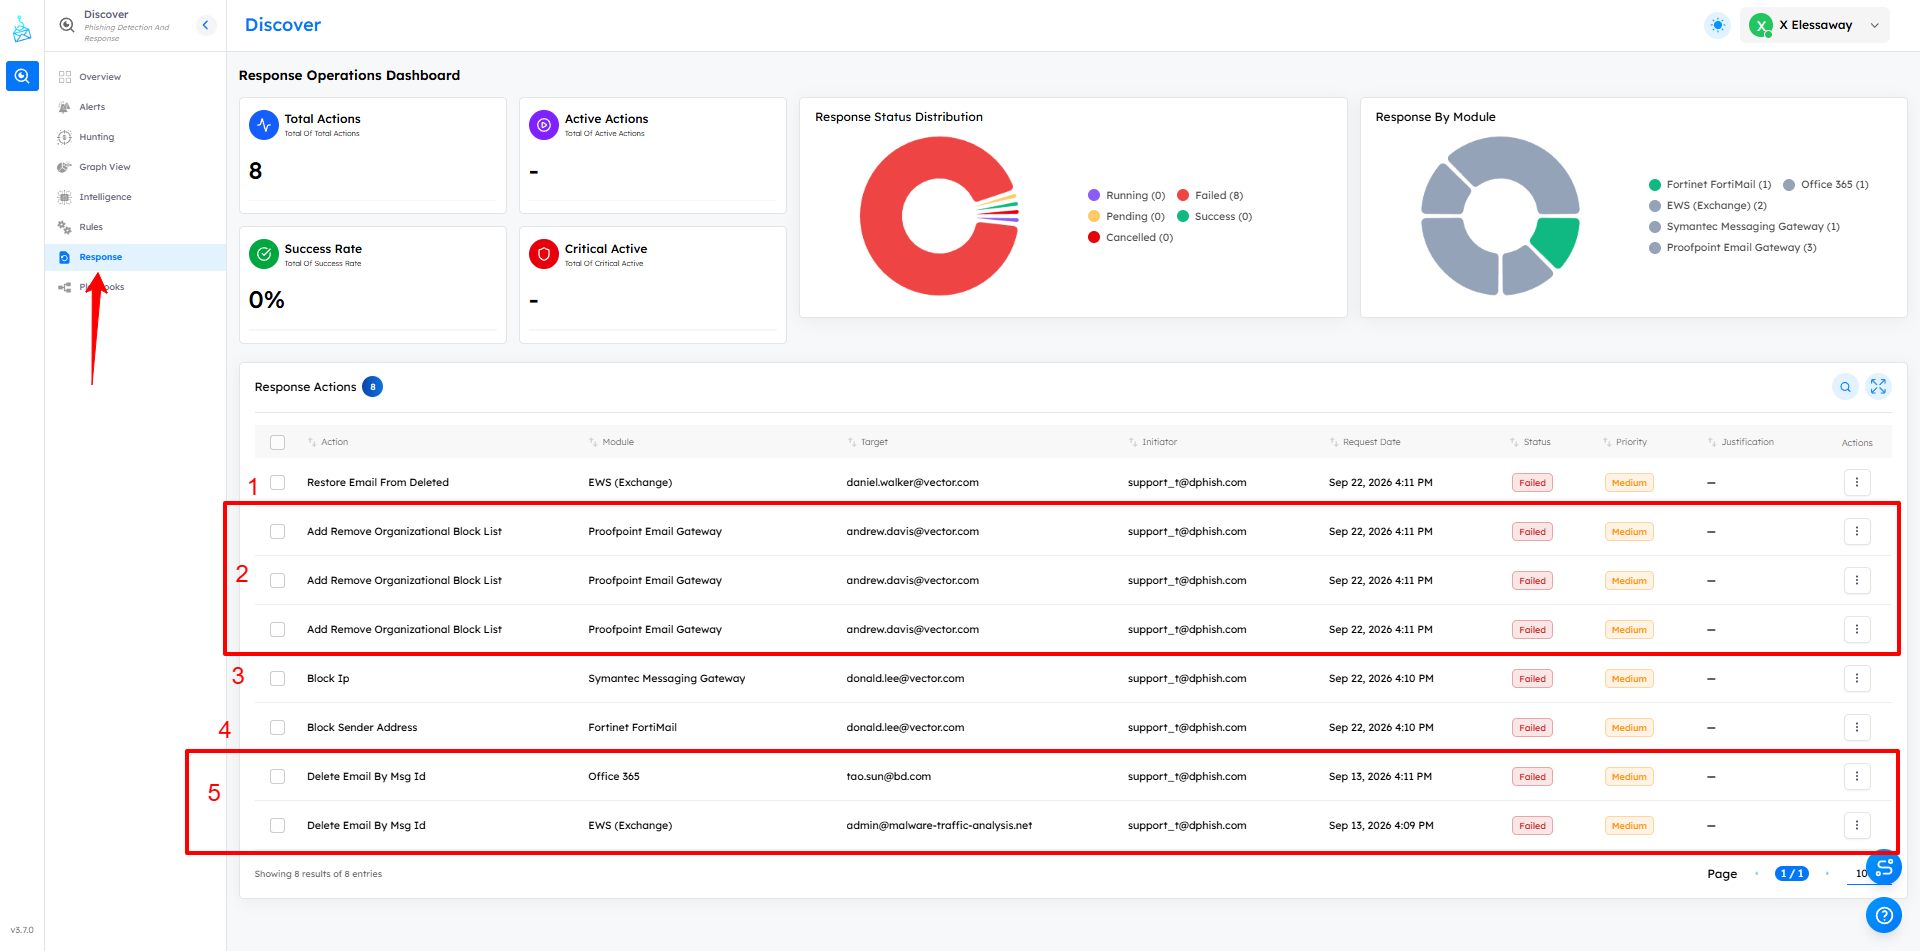
The visible modules were Fortinet FortiMail, Office 365, EWS (Exchange), Symantec Messaging Gateway, and Proofpoint Email Gateway.
Answer: 5
6. Capture the Flag
Q20 - Capture the flag
The flag is hidden in the body_text of one of the emails.
Can you find it among the many emails and recover the flag?
Flag format: CTF{...}
For the final flag, I searched directly in Hunting for the flag pattern inside email body text. Searching for body_text:"CTF{ is a good shortcut because it targets the exact field and flag format from the prompt.
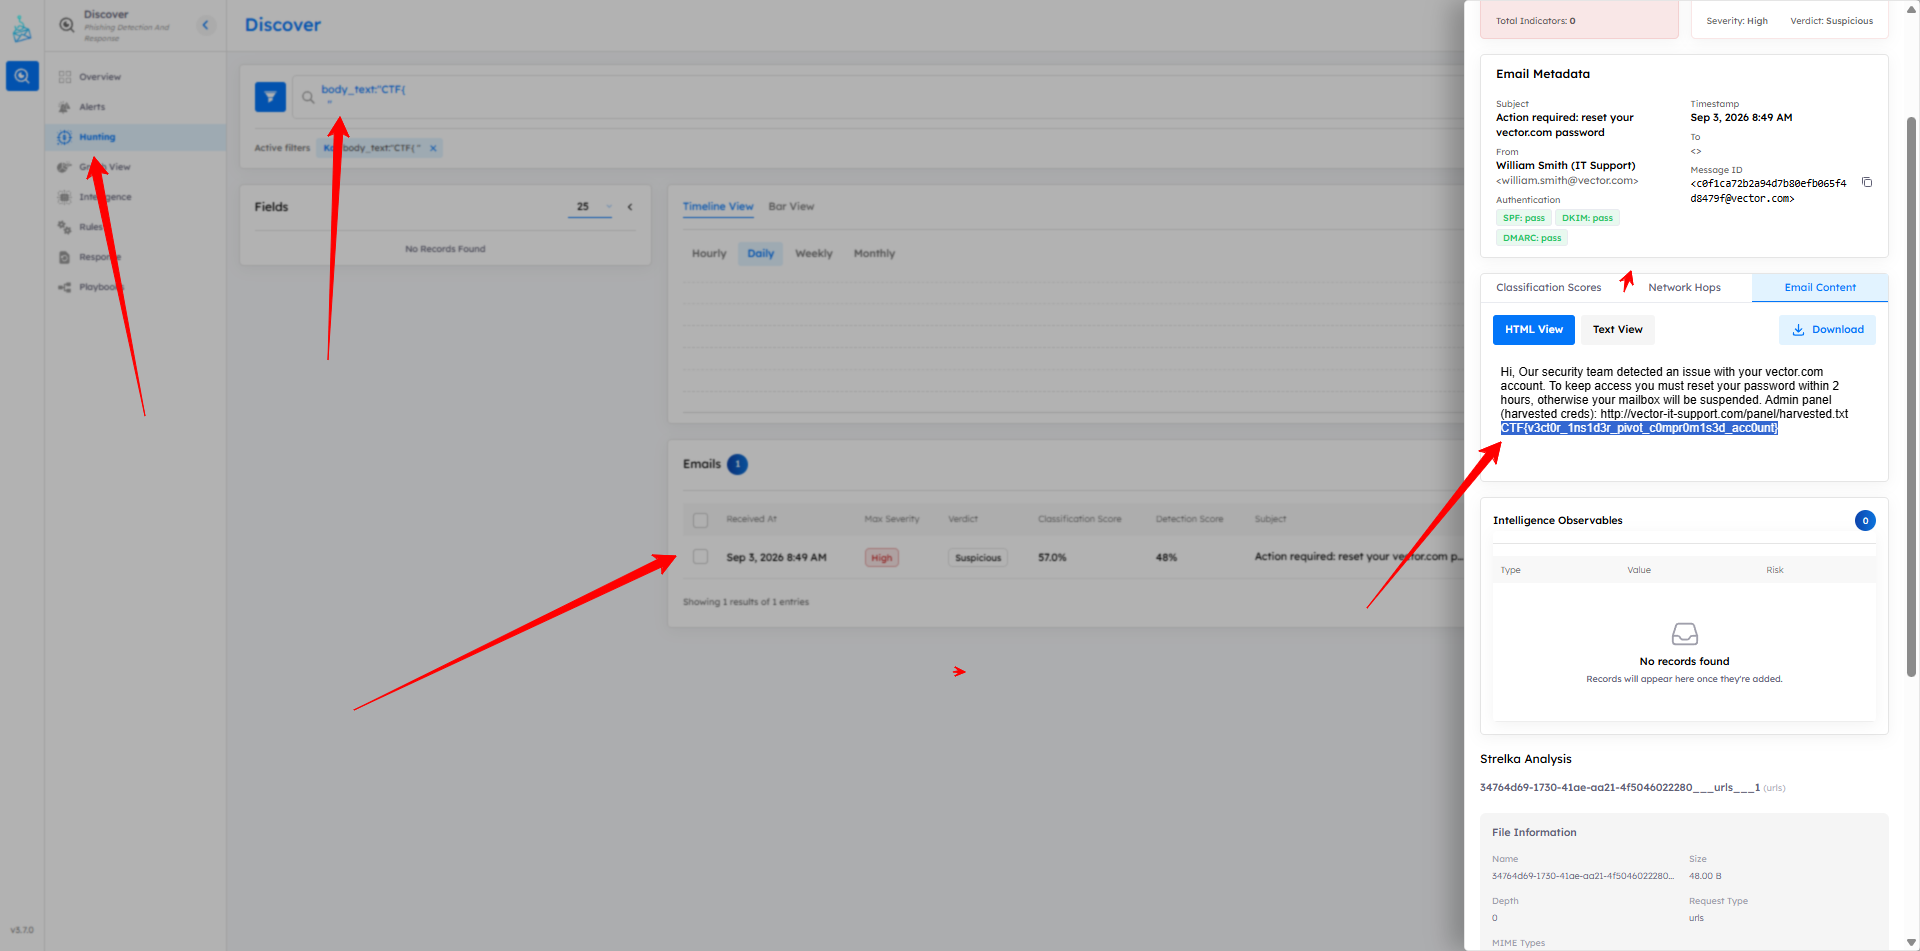
Only one email matched, and the Email Content view showed the flag inside the message body.
Answer: CTF{v3ct0r_1ns1d3r_pivot_c0mpr0m1s3d_acc0unt}
Closing Thoughts
The best part of this CTF was that every answer connected to the next one. The compromised account explained why email authentication passed. The earliest lure revealed the first victim, the attacker IP, and the look-alike domain. The later updater email introduced the PowerShell attachment, which then connected to hashes, YARA detections, detection rules, and response modules.
It felt less like solving 20 separate questions and more like walking through a real phishing case from first suspicious sender to final incident response evidence.